Tag: snacks

Apple Cinnamon Nut Muffins (Grain-free, Dairy-free, Egg-free)

Apple Cinnamon Nut Muffins (Grain-free, Dairy-free, Egg-free)

Have you ever had a best friend be right there with you as you struggled through a really hard time? That’s what these Apple Cinnamon Nut Muffins were for me on my quest to eliminate gluten, dairy, soy, sugar, and eggs from my diet! These 

Chocolate Chip Peppermint Brownies (Grain-Free, Gluten-Free, Dairy-Free!)

Chocolate Chip Peppermint Brownies (Grain-Free, Gluten-Free, Dairy-Free!)

    Looking for a scrumptious, fudgy, brownie recipe? Look no further! These Chocolate Chip Peppermint Brownies are not only AWESOME, they’re gluten, grain, dairy, and soy-free! The peppermint adds an extra holiday feel, but these can be made any time of year! Not a 

Cassava Flour Pumpkin Tartlets (Gluten and Dairy-Free)

Cassava Flour Pumpkin Tartlets (Gluten and Dairy-Free)

Cassava Flour Pumpkin Tartlets with assorted toppings.

Nothing says Fall like homemade pumpkin pie! Just because you’re gluten or dairy-free doesn’t mean you should miss out! These delicious, adorable Cassava Flour Pumpkin Tartlets rival any pumpkin pie out there! Made with Otto’s Cassava Flour, they’re not only gluten-free, but grain-free and paleo as well! Sprinkle with your favorite toppings to add even more fun! I love them topped with mini dairy-free chocolate chips and chopped pecans! Healthy and scrumptious!!!


Check out Otto’s Cassava Flour by clicking here:Bag of Otto's Cassava Flour

Ingredients for Filling:

-1 can organic pumpkin – BPA free (15 oz) (not pumpkin pie filling)

-1/2 cup organic coconut milk

-3 cage-free eggs

-1 teaspoon vanilla extract 

-2 tablespoons pumpkin pie spice

-1/3 cup organic maple syrup

-pinch pink Himalayan salt

Optional toppings – chopped pecans and/or Enjoy Life Mini Semi-Sweet Chocolate Chips

*Inspiration for this pumpkin pie filling came from Downshiftology – Paleo Pumpkin Pie. I love Lisa’s choice of healthy, whole-food, gluten and dairy-free ingredients! I just tweaked the proportions a bit, then added my own toppings.

Three Cassava Flour Pumpkin Tartlets - one plain, one topped with pecans, and the third topped with mini chocolate chips and pecans on white plate.


Ingredients for Tartlet Shell:

-1 1/2 cups Otto’s Cassava Flour

-3 tablespoons organic maple syrup

-1 cage-free egg (I use a duck egg since I’m sensitive to chicken eggs. Either works perfectly.)

-1/2 cup Spectrum Organic Vegetable Shortening

-1/2 teaspoon xanthan gum

-1/2 teaspoon baking soda

-1 teaspoon pink Himalayan salt (my preference because of its high mineral content.)

-1/2 cup filtered water

parchment paper

-mini muffin tins

-3 inch diameter, round cookie cutter (or cup/glass with a 3 inch diameter)


Instructions for Filling:

Blend all pumpkin pie ingredients together using an electric mixer including canned pumpkin, organic coconut milk, vanilla extract, maple syrup, pumpkin pie spice, and salt.


Cassava Flour mini tartlet pie shells made with Otto's Cassava Flour in mini muffin tin


Instructions for Tartlet Shell:

-In a large bowl, whisk cage-free egg. Add maple syrup and blend thoroughly.

-Add Otto’s Cassava Flour, xanthan gum, salt, baking soda, and Spectrum Organic Vegetable Shortening and water. Blend into a dough, first by mixing with a spoon and then using your hands to fully incorporate ingredients. (A stand mixer can also be used.)

-If dough is too dry, add additional water, 1 tablespoon at a time. If dough is too wet, add additional cassava flour, 1 tablespoon at a time.

-Roll out dough between 2 pieces of parchment paper to about 1/8 inch thickness.

-Using cookie cutter or cup, cut out 36 dough circles. Repeated rolling and collection of the scraps will be needed to attain the 36 dough circles.


Making Cassava Flour Pumpkin Tartlets pie crusts. Rolling out dough, cutting dough into circles, forming dough into muffin tin.


-Preheat oven to 375 degrees

-Carefully fit dough circles inside muffin tins to create mini tart shells.

-Fill each mini tart shell with pumpkin filling.

-Optional: Sprinkle top of filled tartlet with chopped pecans, Enjoy Life Mini Chocolate Chips or both!!!

Unbaked Cassava Flour Pumpkin Tartlets plain and topped with pecans, mini Enjoy Life Chocolate Chips, or both.


-Bake at 375 degrees for 20 minutes, until pumpkin filling sets and dough slightly browns.


Enjoy your Cassava Flour Pumpkin Tartlets plain!
Five Cassava Flour Pumpkin Tartlets stacked. White background.


With chopped pecans!

Baked Cassava Flour Pumpkin Tartlets with chopped pecans. Gluten and dairy-free


With Enjoy Life Mini Chocolate Chips (Dairy-free)Five baked Cassava Flour Pumpkin Tartlets topped with mini Enjoy Life Semi Sweet Chocolate Chips

***


Black banner with red and white writing inviting readers to comment below and share their pictures of this recipe on instagram.


Cassava Flour Pumpkin Tartlets with chopped pecans and Enjoy Life Mini Chocolate Chips!

Cassava Flour Pumpkin Tartlets topped with chopped pecans and Enjoy Life Mini Semi Sweet Chocolate Chips


My personal favorite – pecans and chocolate chips!!!

One Cassava Flour Pumpkin Tartlet topped with chopped pecans and mini Enjoy Life Semi Sweet Chocolate Chips with a bite taken out.

CLICK HERE TO SHOP

for Yuca Chips

and for pantry items & kitchen gadgets I personally use to make Crazy For Yuca recipes!


Siete, Plant Wise, Artisan Tropics, and Jan's yuca / cassava chips.


*By ordering recommended products through affiliate connections on our website we get a small percentage of the sale which helps to support the maintenance of Crazy For Yuca. There’s absolutely no additional charge to you. Thank you so much for supporting our efforts to bring you the latest yuca/cassava recipes!


Yellow banner with black writing inviting readers to subscribe to CrazyForYuca.com


***


***


Cassava Flour Pumpkin Tartlets (Gluten and Dairy-Free)
Prep Time
40 mins
Cook Time
20 mins
Total Time
1 hr
 

What says Fall like homemade pumpkin pie! Just because you're gluten or dairy-free doesn't mean you should miss out! These delicious, adorable Cassava Flour Pumpkin Tartlets rival any pumpkin pie out there! Sprinkle with your favorite toppings. I love them topped with mini dairy-free chocolate chips and chopped pecans!

Course: Breakfast, brunch, Dessert
Cuisine: dairy-free, gluten-free, grain-free, Paleo
Keyword: pumpkin pie, tarlets, tarts
Servings: 36 Tartlets
Author: Lauren from Crazy For Yuca
Ingredients
Ingredients for Filling:
  • 1 can organic pumpkin - BPA free (not pumpkin pie filling)
  • 1/2 cup organic coconut milk
  • 3 cage-free eggs
  • 1 teaspoon vanilla
  • 2 tablespoons pumpkin pie spice
  • 1/3 cup organic maple syrup
  • pinch pink Himalayan salt
  • Optional toppings - chopped pecans and/or Enjoy Life Mini Chocolate Chips
Ingredients for Tartlet Shell:
  • 1 1/2 cups Otto's Cassava Flour
  • 3 tablespoons organic maple syrup
  • 1 cage-free egg I use a duck egg since I'm sensitive to chicken eggs. Either works perfectly.
  • 1/2 cup Spectrum Organic Vegetable Shortening
  • 1/2 teaspoon xanthan gum
  • 1/2 teaspoon baking soda
  • 1 teaspoon pink Himalayan salt my preference because of its high mineral content.
  • 1/2 cup filtered water
  • parchment paper
  • mini muffin tins
  • 3 inch diameter round cookie cutter (or cup/glass with a 3 inch diameter)
Instructions
Instructions for Filling:
  1. Blend all pumpkin pie ingredients together using an electric mixer including canned pumpkin, organic coconut milk, vanilla extract, maple syrup, pumpkin pie spice, and salt.
Instructions for Tartlet Shell:
  1. In a large bowl, whisk cage-free egg. Add maple syrup and blend thoroughly.

  2. Add Otto's Cassava Flour, xanthan gum, salt, baking soda, and Spectrum Organic Vegetable Shortening and water. Blend into a dough, first by mixing with a spoon and then using your hands to fully incorporate ingredients. (A stand mixer can also be used.)

  3. If dough is too dry, add additional water 1 tablespoon at a time. If dough is too wet, add additional cassava flour 1 tablespoon at a time.

  4. Roll out dough on parchment paper to 1/8 inch thickness.

  5. Using cookie cutter or cup, cut out 36 dough circles. Repeated rolling and collection of the scraps will be needed to attain the 36 dough circles.

  6. Preheat oven to 375 degrees

  7. Carefully fit circles inside muffin tins to create mini tart shells.

  8. Fill each mini tart shell with pumpkin filling.

  9. Optional: Sprinkle top of filled tartlet with chopped pecans, mini chocolate chips or both!!!

  10. Bake at 375 degrees for 20 minutes, until pumpkin filling sets and dough slightly browns.

  11. Enjoy your Cassava Flour Pumpkin Tartlets!


Disclaimer– In Crazy for Yuca I write about my own personal health and diet journey.  My experience and recipes are not to be considered expert advice or suggestive that anyone follow any particular diet protocol.  Each person’s body and medical issues are individual and need to be evaluated by a medical professional.  If you have any concerns due to your specific diagnoses, please consult your doctor before eating yuca.

CrazyForYuca.com logo with red heart and yellow lettering.

Gluten-Free Baguettes

Gluten-Free Baguettes

These baguettes are AMAZING! You’d never guess they’re gluten-free! And they’re super simple to make! Perfectly crispy on the outside and soft and airy on the inside – just like good bread should be! I had to make it for myself after watching Jules Shepard 

Chocolate SunButter Pinwheel Cookies (Gluten-Free, Dairy-Free, Nut-Free)

Chocolate SunButter Pinwheel Cookies (Gluten-Free, Dairy-Free, Nut-Free)

Everything is awesome with chocolate – am I right??? These Chocolate SunButter Pinwheel Cookies are a variation of my Strawberry Almond Butter Pinwheel Cookies (which are great even without chocolate!) Not only is this variation gluten, grain, dairy, and soy-free, but can be made nut-free as 

Paleo Nut and Seed Bars

Paleo Nut and Seed Bars

Paleo Nut and Seed Bar on white plate with scattered nuts and seeds.

What do you get when you take cassava flour and a bunch of nuts and seeds? Delicious, nutritious Paleo Nut and Seed Bars!!!! These bars have just enough sweetness, without being overly sweet. Cassava flour is a low-glycemic, non-inflammatory starch, while nuts and seeds provide an excellent source of healthy fats, complex carbohydrates, protein, vitamins, minerals, fiber, and immune boosting phytonutrients! Try the nuts and seeds suggested, or choose your own favorites! These nutrient dense Paleo Nut and Seed Bars are perfect for a snack, dessert, breakfast or bunch. With all the ready-made bars out there claiming to be healthy (which are actually often full of chemicals and other processed ingredients) it’s nice to know there’s a truly healthy, scrumptious bar that’s quick and easy to make!

These bars can be frozen, and pulled out whenever needed. They’re even awesome right out of the freezer! No defrosting needed!!!

Four Paleo Nut and Seed Bars on wooden cutting board.

Let’s make Paleo Nut and Seed Bars!

Makes 12 bars

*Printer-friendly recipe below*

Ingredients for the cookie crust:

-2 1/4 cups Otto’s Cassava Flour

-3 organic, cage-free eggs (I use duck eggs, but chicken eggs can also be used)

-2/3 cup organic coconut oil – melted

-3/4 cup organic maple syrup

-2 teaspoons pure vanilla extract

-1 tablespoon ground cinnamon

-2 teaspoons xantham gum

-1 teaspoon pink Himalayan salt

-Optional: parchment paper (I prefer lining baking dishes with parchment for toxin-free, non-stick baking, and easy clean up.)

Paleo Nut and Seed Bar Close up on wooden cutting board.

Topping ingredients:

Organic Sweetened Condensed Coconut Milk  (I use Let’s Do Organic brand which is Non-dairy, Vegan, Gluten-free, and Kosher)

-1/2 cup Unsalted, Dry Toasted Sliced Almonds (I use Trader Joe’s brand)

-1/2 cup Dry Roasted & Unsalted Pistachio Nutmeats (I use Trader Joe’s brand)

-1/2 cup Unsalted Dry Toasted Pecan Pieces (I use Trader Joe’s brand)

-1/3 cup Organic Unsweetened Shredded Coconut (I use Trader Joe’s brand)

-1-2 tablespoons Organic Chia Seeds (I use Trader Joe’s brand)

-1-2 tablespoons Raw Shelled Hemp Seed (I use Trader Joe’s brand)

I’m clearly a big fan of Trader Joe’s!! (lololol) You just can’t beat their prices, quality, and customer service!

*Note: Don’t be overly concerned with the brands, types, or amounts of nuts and seeds I used. These bars will taste great with any nuts and seeds you have on hand in any amounts you enjoy. 


Need Otto’s Cassava Flour? Click here to check it out!
Bag of Otto's Cassava Flour

For more information on baking with cassava flour click here: Getting to Know Cassava (Yuca) Flour

To discover all the nutrition benefits of eating yuca click here: Yuca (Cassava) Nutrition Facts


Need Sweetened Condensed Coconut Milk? Click here to order online

Can of Organic Sweetened Condensed Coconut Milk by Let's Do... Organic.

Note: No need to run to the store! Many non-perishable ingredients listed above can be purchased by simply clicking on the ingredient within the recipe.

By ordering recommended products through links on our website we get a small commission which helps to support the maintenance of Crazy For Yuca. There’s absolutely no additional charge to you. Thank you so much for supporting our efforts to bring you the latest yuca/cassava recipes! 

Instructions for cookie crust:

Preheat oven to 375 degrees.

In a large bowl, blend Otto’s Cassava Flour,  pink Himalayan salt, cinnamon, and xantham gum.

In a second bowl, blend maple syrup, melted coconut oil, eggs, and vanilla.

Add wet ingredients to dry ingredient bowl and mix just until fully combined. *Do not over-mix or cookie crust may come out gummy. 

Line a 9×11 inch baking pan with parchment paper. (This step is optional, but allows for easy clean up, as well as non-toxic, non-stick baking without the need to grease the pan.) Choose a baking pan that’s deep enough to hold the 3/4″ crust as well as the toppings which will be added after initial baking.

Spoon dough into parchment lined pan and press down so dough forms an even cookie crust about 3/4″ thick.


Dough pressed to bottom of pan to form cookie crust – before bakingUnbaked cookie crust for Oven Baked S'mores Bars - Gluten-Free, Grain-Free, Dairy-Free.


Bake at 375 degrees for 20-25 minutes until edges become slightly brown and a fork stuck into center comes out clean.


Baked cassava flour cookie crust. Notice crust thickness – about 3/4″Baked cookie crust for Oven Baked S'mores Bars - Gluten, Dairy, and Grain-free.


Remove from oven, but keep oven on.


Add toppings:

While carefully handling hot pan with oven mitts, spread  Organic Sweetened Condensed Coconut milk on top of cookie crust. (*Note: No need to use the entire can unless you desire a very sweet bar. Use just enough to cover cookie crust.) This will be the “glue” that holds the toppings on.

Scatter sliced almonds, pecan pieces, pistachios, shredded coconut, hemp and chia seeds over the sweetened condensed coconut milk, trying to cover entire cookie crust. It’s fine for nuts and seeds to overlap.

Place back into oven for an additional 10 minutes until toppings adhere to cookie crust.

Allow to cool before cutting into 12 bars.

Enjoy!

Paleo Nut and Seed Bars on white background.


Bars can also be cut into 24 bites if a smaller treat is desired.

Paleo Nut and Seed Bars cut into bites with scattered nuts and seeds, white background.


A stack of Paleo Nut and Seed Bars cut into bites with scattered nuts and seeds on white background.


Black banner with red and white writing inviting readers to comment below and share their pictures of this recipe on instagram.


CLICK HERE TO SHOP

For yuca snacks, pantry items, and kitchen gadgets I personally use to make Crazy For Yuca recipes in my own kitchen.


Siete, Plant Wise, Artisan Tropics, and Jan's yuca / cassava chips.

Have you tried Primal Palate’s Organic Seasonings? They have some truly awesome blends!!!

Click below to check them out. Delish!!!

Primal Palate Essential Spice Bundle.


Yellow banner with black writing inviting readers to subscribe to CrazyForYuca.com


5 from 1 vote
Paleo Nut and Seed Bars
Prep Time
15 mins
Cook Time
30 mins
Total Time
45 mins
 

What do you get when you take cassava flour and a bunch of nuts and seeds? Delicious, nutritious Paleo Nut and Seed Bars!!!! Cassava flour is a low-glycemic, non-inflammatory starch, while nuts and seeds provide an excellent source of healthy fats, complex carbohydrates, protein, vitamins, minerals, fiber, and immune boosting phytonutrients! Try the nuts and seeds suggested, or choose your own favorites! These nutrient dense Paleo Nut and Seed Bars are perfect for a snack, dessert, breakfast or bunch. It's nice to know there's a truly healthy, scrumptious bar that's quick and easy to make!

Course: Breakfast, brunch, Dessert, Snack
Cuisine: dairy-free, gluten-free, grain-free, Paleo
Keyword: cookie bar, nuts, nuts and seeds, ottos cassava flour, paleo dessert, paleo treat
Servings: 12 bars
Author: Lauren from Crazy For Yuca
Ingredients
Ingredients for cookie crust
  • 2 1/4 cups Otto's Cassava Flour
  • 3 organic cage-free eggs (I use duck eggs, but chicken eggs can also be used)
  • 2/3 cup organic coconut oil - melted
  • 3/4 cup organic maple syrup
  • 2 teaspoons pure vanilla extract
  • 1 tablespoon ground cinnamon
  • 2 teaspoons xantham gum
  • 1 teaspoon pink Himalayan salt
  • Optional: parchment paper. I prefer lining baking dishes with parchment for toxin-free, non-stick baking, and easy clean up.
Topping ingredients
  • 1 can Organic Sweetened Condensed Coconut Milk  (I use Let's Do Organic brand which is Non-dairy, Vegan, Gluten-free, and Kosher)
  • 1/2 cup Unsalted, Dry Toasted Sliced Almonds (I use Trader Joe's brand)
  • 1/2 cup Dry Roasted & Unsalted Pistachio Nutmeats (I use Trader Joe's brand)
  • 1/2 cup Unsalted Dry Toasted Pecan Pieces (I use Trader Joe's brand)
  • 1/3 cup Organic Unsweetened Shredded Coconut (I use Trader Joe's brand)
  • 1-2 tablespoons Organic Chia Seeds (I use Trader Joe's brand)
  • 1-2 tablespoons Raw Shelled Hemp Seed (I use Trader Joe's brand)
Instructions
Instructions for cookie crust
  1. Preheat oven to 375 degrees.

  2. In a large bowl, blend Otto's Cassava Flour, pink Himalayan salt, cinnamon, and xantham gum.

  3. In a second bowl, blend maple syrup, melted coconut oil, eggs, and vanilla.

  4. Add wet ingredients to dry ingredient bowl and mix just until fully combined. *Do not over-mix or cookie crust may come out gummy. 

  5. Line a 9x11 inch baking pan with parchment paper. (This step is optional, but allows for easy clean up, as well as non-toxic, non-stick baking without the need to grease the pan.) Choose a baking pan that's deep enough to hold the 3/4" crust as well as the toppings which will be added after initial baking.

  6. Spoon dough into parchment lined pan and press down so dough forms an even cookie crust about 3/4" thick.

  7. Bake at 375 degrees for 20-25 minutes until edges become slightly brown and a fork stuck into center comes out clean.

  8. Remove from oven, but keep oven on.

Add toppings:
  1. While carefully handling hot pan with oven mitts, spread Organic Sweetened Condensed Coconut milk on top of cookie crust. (*Note: No need to use the entire can unless you desire a very sweet bar. Use just enough to cover cookie crust.) This will be the "glue" that holds the toppings on.

  2. Scatter sliced almonds, pecan pieces, pistachios, shredded coconut, hemp and chia seeds over the sweetened condensed coconut milk, trying to cover entire cookie crust. It's fine for nuts and seeds to overlap.

  3. Place back into oven for an additional 10 minutes until toppings adhere to cookie crust.

  4. Allow to cool before cutting into 12 bars.

  5. Enjoy!

Recipe Notes

These bars freeze perfectly! Bake, cool, then throw in the freezer for a ready-made treat any time!


Not an Amazon Prime member yet?

Try it free for 30 days by clicking here!


Disclaimer– In Crazy for Yuca I write about my own personal health and diet journey.  My experience and recipes are not to be considered expert advice or suggestive that anyone follow any particular diet protocol.  Each person’s body and medical issues are individual and need to be evaluated by a medical professional.  If you have any concerns due to your specific diagnoses, please consult your doctor before eating yuca.

Heart-shaped Crazy For Yuca logo

Oven Baked S’mores Bars (Gluten-Free, Dairy-Free, Grain-Free)

Oven Baked S’mores Bars (Gluten-Free, Dairy-Free, Grain-Free)

Bring the campfire home with Oven Baked S’mores Bars! These were created as a surprise birthday “cake” for my daughter who is gluten and dairy-free! She isn’t a fan of typical cake so I wanted to come up with something special. (Mission accomplished!!!) Years ago, 

Yuca Chip Chat!

Yuca Chip Chat!

Have you tried Yuca Chips yet??? If not, maybe this post will inspire you. They’re crispy, crunchy, and DELICIOUS! While my Perfect Yuca Chip recipe is AWESOME, you likely don’t have time to break out the mandolin every time you’d like a snack. And since 

Chocolate Hazelnut Butter

Chocolate Hazelnut Butter

A strawberry dipped into Chocolate Hazelnut Butter

If you’re a Nutella fan, but prefer a healthy version that’s free of dairy, refined sugar, soy, and processed inflammatory oils, this Chocolate Hazelnut Butter is for you! While the first ingredient of Nutella is sugar, with only 13% hazelnuts, the predominant ingredient in this Chocolate Hazelnut Butter is hazelnuts! I included a delicious sugar-free option (my personal favorite!) as well as an option to add a bit of non-refined sugar in case a little more sweetness is preferred.

Hazelnuts make an awesome tasting nut butter! I don’t understand why it’s not as popular as peanut butter? Just imagine the possibilities of how this Chocolate Hazelnut Butter can be used??? It can be drizzled over my cassava flour pancakes (Yuca-ta Try These Pancakes) or any dessert, used as a dip for apples, strawberries or other fruit, used as a filling for my Grain-Free Crepes, or spread on gluten-free bread (like my Flatbread) as a nutritious breakfast or snack! It’s a decadent, yet healthy treat you can feel good about serving to your family!

A fruit skewer with blueberries, sliced strawberries, apples and banana with drizzled Chocolate Hazelnut Butter on white plate.

Let’s make some Chocolate Hazelnut Butter!!!

(*Full Printer-Friendly recipe below*)

Nutritious “real food” ingredients needed:

-1 16 oz bag raw hazelnuts (about 3 cups) or dry roasted hazelnuts (If using dry roasted hazelnuts, skip roasting and skin removing steps below.)

-2 tablespoons organic cacao powder (Cocoa powder could also be used, but it’s not as pure, or rich in  fiber, antioxidants and other nutrients. Both are healthy and will make delicious Chocolate Hazelnut Butter!)

-1/4 cup organic coconut oil – melted

-1 teaspoon pure vanilla extract

-Sweetener Options: – 1/4 cup organic coconut sugar or 1/8 teaspoon Pure Monk, a 100% organic, zero calorie sweetener that has no affect on blood sugar. (See more information on Pure Monk below.)

-pinch of pink Himalayan salt (Any salt can be used, but I prefer pink Himalayan because of its high mineral content.)

Instructions:

If using raw hazelnuts, preheat oven to 400 degrees. Raw hazelnuts must first be roasted, after which skins can be easily removed.   

-Roasting hazelnuts: Spread raw hazelnuts on a cookie sheet and bake for 10-12 minutes, until nuts start to brown and skins loosen.  Allow to cool. 

-Place cooled, roasted hazelnuts on a clean dish towel, gather ends together creating a sealed “bag”, then rub and roll nuts and towel together to remove nut skins. The more that gets removed, the creamier the texture of the nut butter, but it’s unnecessary (and nearly impossible) to remove 100% of skins.  

-Place roasted, skinned hazelnuts in a food processor (I use a Vitamix, but any food processor can be used.) Process nuts for about 5 minutes, until they become the consistency of creamy nut butter. It may be necessary to stop every minute or 2 to scrape the sides to keep everything blending together. 

Continue processing until your hazelnut butter resembles the picture on the right below. 

Two pictures of different stages of Hazelnut Butter being blended in Vitamix.

-Add cacao powder, sweetener, vanilla, and salt, and continue blending for another minute until fully combined and smooth.

*I store mine in a sealed glass container in the fridge for up to 2 weeks (although it rarely lasts that long!) 

There are an endless number of things that can be done with this decadent treat! 

Chocolate Hazelnut Butter makes eating fruit a whole lot more fun!!!

Chocolate Hazelnut Butter with a plate of cut up bananas, apples, oranges, strawberries and blueberries.

A skewer of blueberries and sliced banana being dipped into a jar of Chocolate Hazelnut Butter.

An apple slice being dipped into Chocolate Hazelnut Butter on cutting board with a whole apple sliced on an apple slicer.

Make Chocolate Hazelnut Butter Crepes using my Grain-Free Crepe recipe! It’s extra scrumptious with bananas!!! Roll them up or make triangles!

Making Chocolate Hazelnut Butter Grain-Free Crepes with sliced bananas


Chocolate Hazelnut Butter Crepe Pizza with strawberries, bananas, blueberries, shredded coconut, and pecan pieces! (Or whatever toppings you like!!!)

Chocolate Hazelnut Butter Crepe Pizza (Gluten-Free, Grain-Free, Dairy-Free) with shredded coconut, strawberries, bananas, blueberries, and pecan pieces on white plate.

What would you like to do with your Chocolate Hazelnut Butter??? Send me pictures of your creations!!! Or post them on Instagram and tag @CrazyForYuca 

***

Healthy Eating Tip: Decrease the sugar and give monk fruit sweetener a try!

Monk fruit, also known as lo han guo, is a melon grown in Southeast Asia. It has been used in Eastern medicine to treat ailments for centuries. Monk fruit sweetener is a natural extract of monk fruit, with a single serving containing zero calories. It’s highly recommended for weight loss and diabetics since it doesn’t impact blood sugar levels. Organic Pure Monk is almost 300 times sweetener than sugar! Very little goes a long way! The taste is different than sugar, and may take some getting used to. It’s FDA approved and considered safe for children and women who are pregnant or nursing.

Note: If you buy any brand of monk fruit sweetener other than Pure Monk, be sure to read the label carefully. Many call their sweeteners monk fruit, but blend them with other sweeteners to make the taste more similar in taste and sweetness to sugar. The added ingredients may add calories, decrease the relative sweetness, or change the health profile of the sweetener. Give pure monk fruit sweetener a try and let me know what you think. But trust me, use VERY little. More is not better in this case.

Check out Pure Monk by clicking the link below.

Pure Monk ( Monk Fruit ) 100 Servings 3.5 oz Paleo Sugar Free Sweetener

CLICK HERE TO SHOP

for pantry items and kitchen gadgets needed to make Chocolate Hazelnut Butter or other Crazy For Yuca recipes. I personally use all recommended products in my own kitchen! 

CHECK OUT YUCA/CASSAVA SNACKS by clicking here or oN MY SHOPPING TAB in the menu above!

 All yuca/cassava snacks have been taste tested and approved by myself and my family! For a discussion of recommended yuca/cassava chips, see my post The Perfect Yuca Chip!

*By ordering recommended products through affiliate connections on our website we get a small percentage of the sale which helps to support the maintenance of Crazy For Yuca. There’s absolutely no additional charge to you. Thank you so much for supporting our efforts to bring you the latest yuca/cassava recipes!

Still not an Amazon Prime member?

Click below and get a free 30 day trial!

Do you actually like paying for shipping and waiting extra time to receive your order?  With Amazon Prime you not only get free shipping, but free Amazon TV, music and movie streaming, and more! Check it out the details below.

Try Amazon Prime 30-Day Free Trial

Black banner with red and white writing inviting readers to comment below as well as share their crepe pictures on instagram.

Chocolate Hazelnut Butter
Cook Time
30 mins
 

If you're a Nutella fan, but prefer a healthy version that's free of dairy, refined sugar, soy, and processed inflammatory oils, this Chocolate Hazelnut Butter is for you! Just imagine the possibilities??? It can be drizzled over pancakes or any dessert, used as a dip for apples, strawberries or other fruit, used as a filling for my Grain-Free Crepes, spread on gluten-free bread (like my Flatbread) as a nutritious breakfast or snack... You name it! It's a decadent, yet healthy treat you can feel good about serving to your family.

Course: Breakfast, brunch, Dessert, Snack
Author: Lauren from Crazy For Yuca
Ingredients
  • 16 oz bag raw hazelnuts (about 3 cups) Dry roasted hazelnuts can also be used. (If using dry roasted hazelnuts, skip roasting and skin removing steps below.)
  • 2 tablespoons organic cacao powder (Cocoa powder could also be used, but it's not as pure, or rich in fiber, antioxidants and other nutrients. Both are healthy, delicious options.)
  • 1 teaspoon pure vanilla extract
  • Sweetener Options: - 1/4 cup organic coconut sugar or 1/8 teaspoon PureMonk - for sugar-free option. (100% organic monk fruit sweetener contains zero calories and has no affect on blood sugar.)
  • pinch of pink Himalayan salt (Any salt can be used, but I prefer pink Himalayan because of its high mineral content.)
Instructions
Instructions:
  1. If using raw hazelnuts, preheat oven to 400 degrees. Raw hazelnuts must first be roasted, after which skins can be easily removed. If dry roasted hazelnuts are being used, skip to step 4.

  2. Spread raw hazelnuts on a cookie sheet. Bake for 10-12 minutes until nuts start to brown and skins loosen. Allow to cool.

  3. Place cooled, roasted hazelnuts on a clean dish towel, and gather ends together to create a sealed "bag." Rub and roll nuts and towel together to remove nut skins. The more that get removed, the creamier the texture of the hazelnut butter, but it's unnecessary (and nearly impossible) to remove 100% of skins.

  4. Place roasted, skinned hazelnuts in a food processor (I use a Vitamix, but any food processor can be used.) Process nuts for about 5 minutes, until they become the consistency of nut butter. It may be necessary to stop every minute or 2 to scrape nut butter off the sides so everything blends together.

  5. Add cacao powder, sweetener, vanilla, and salt, and continue blending for another minute until fully combined and smooth. 


  6. Have fun drizzling, dipping, and spreading your Chocolate Hazelnut Butter on anything desired!

  7. I store mine in a sealed glass container in the fridge for up to 2 weeks (although it rarely lasts that long!) 

Try AmazonFresh Free Trial 
***
Yellow banner with black writing inviting readers to subscribe to CrazyForYuca.com

***

Shop Amazon Warehouse Deals – Deep Discounts on Open-box and Used Kitchen Gadgets

Crazy For Yuca logs - red and yellow lettering with large red heart.

Disclaimer– In Crazy for Yuca I write about my own personal health and diet journey.  My experience and recipes are not to be considered expert advice or suggestive that anyone follow any particular diet protocol.  Each person’s body and medical issues are individual and need to be evaluated by a medical professional.  If you have any concerns due to your specific diagnoses, please consult your doctor before eating yuca.

Crazy For Yuca log - Red heart with yellow writing.

Grain-Free Crepes With Strawberry Jam

Grain-Free Crepes With Strawberry Jam

Grain-Free Crepes are quick and easy to prepare, and lots of fun to eat! They can be filled with almost anything – whether sweet or savory! With a fruit filling, such as strawberry jam, they’re perfect for entertaining guests for brunch, or as a sweet 

Avocado Yuca Toast

Avocado Yuca Toast

How do you like your Avocado Toast? Slathered in guacamole? With organic turkey bacon and tomatoes? With a sunny side up egg? – with a broken yolk dripping down your toast…  No matter how they’re garnished, they are a truly special treat! Made on top 

Grain-Free Soft Pretzels

Grain-Free Soft Pretzels


A hand holding a Grain-Free Soft Pretzels with small bowl of mustard in background.

Who doesn’t love a salty hot pretzel??? As a gluten-free eater I thought I’d never have one again, until now! These Grain-Free Soft Pretzels are THE REAL DEAL!!! They’re made with Otto’s Cassava Flour, so they’re naturally gluten and grain-free! With all “real” whole food ingredients, this is a snack that you can feel good about eating and serving to your family. This soft, chewy dough topped with coarse salt is indistinguishable from soft pretzels made from wheat! Never feel deprived again! Eat them plain, with your favorite mustard, or other dipping sauce. You’ll be happy you did!!!


This first thing you’ll need in order to make your Grain-Free Soft Pretzels is a bag of Otto’s Cassava Flour which you can purchase by clicking the link below.

Otto’s Naturals 100% Natural Cassava Flour Made from Yuca Root Bag, 2 Pound
A 2 pound bag of Otto's Cassava Flour.


See: Getting To Know Cassava (Yuca) Flour for more information about this incredibly versatile gluten-free, grain-free, non-GMO, Paleo, Whole30 approved, autoimmune protocol friendly flour!


***At Crazy For Yuca, my goal is to bring my followers the best gluten-free, dairy-free, “real” food recipes featuring yuca and cassava flour. (Yuca and cassava are the same thing.) Some of my posts are original CrazyForYuca recipes, and others are from other bloggers and recipe developers who are doing amazing things with yuca/cassava! (Because there’s no need to re-invent the wheel – am I right???) My goal is to become the place yuca lovers can go to find all the best yuca/cassava recipes!

I test out others’ recipes to ensure they’re awesome, tweak them to fit my eating style if needed, take my own step by step pictures while making them, and post along with my personal tips – giving full credit to the original recipe creator with a link to their post. If it isn’t my own recipe I cannot legally provide the full recipe in my post.

This recipe was created by Heather Resler of CookItUpPaleo.com.

Heather did an incredible job of re-creating soft pretzels using cassava flour! I’ve had my eye on this recipe since I launched my site back in November and finally had time to make them. They will definitely be a staple in my house from now on! Thank you Heather!

After reading my post about them, check out her full recipe by clicking this link: “Paleo Soft Pretzels.” Heather also has an AIP version without the yeast which she calls “AIP Soft Pretzel Bites.”


These Grain-Free Soft Pretzels are truly AMAZING!

One Grain-Free Soft Pretzel with small bowl of mustard.


To make Grain-Free Soft Pretzels you will need the following ingredients:

Links to all non-perishable pantry items can be found in the shopping tab above or by clicking on the ingredient listed below. 


Ingredients for pretzel dough:

Otto’s Cassava Flour

-warm water

-extra virgin olive oil (I used avocado oil, as I do for most baking, because of its high smoke point. An oil’s smoke point is the temperature at which it breaks down, loses nutrients, changes flavor, and may produce free radicals that can be damaging to one’s health. (See: Dr. Axe’s article “Why Avocado Oil Got Rx Status in France.”)

pure maple syrup  (I used Hidden Springs Organic Maple Syrup.)

-cage-free egg (I used a duck egg since I’m sensitive to chicken eggs. Both work perfectly!)

active dry yeast (I used one packet of Fleischmann’s Active Dry Yeast, which is gluten-free and kosher.)

-salt (I used pink Himalayan salt because of its additional mineral content compared to table salt.)

Ingredients for boiling pretzels:

-water

baking soda

Ingredients for pretzel topping:

-egg yolk for egg wash – (Brush pretzels after boiling)

coarse salt (I used Pereg Coarse Crystals Red Sea Salt – which isn’t actually red in color.)


Instructions:

The recipe involves making the pretzel dough, forming it into the desired number of pretzels (depending on how big you want them to be,) boiling them, brushing with an egg wash, topping with coarse salt, and then baking. (While it contains yeast, there’s no requirement to allow time for the dough to rise. I was curious if that was an omission, so I covered the dough and put it in a warm, dark place for an hour, but it didn’t rise. They came out great which just makes these even quicker to make!)

For Heather’s full instructions click here, Paleo Soft Pretzels.


Pretzel dough balls get rolled out into “snakes,” which are formed into pretzel shapes (or whatever shape is preferred!)

Five balls of pretzel dough and one rolled out dough "snake" on parchment.


The pretzel shaped dough is brushed with an egg wash, and sprinkled with coarse salt.

Four unbaked Grain-Free Soft Pretzels coated in egg wash and coarse salt on parchment.


It’s important to use coarse salt, as opposed to a finer grain of salt, if an authentic soft pretzel look and taste is desired. YUM!!!

Heather instructs to use egg yolk mixed with a little water for the egg wash. My pretzels came out a bit darker in color than I would have liked (but still deliciously tasty!) Next time I will try using either the whole egg or just the egg whites to get a lighter colored pretzel. (The color may have been darker because I use duck eggs.)

Four baked Grain-Free Soft Pretzels.


Serve plain, with mustard, or any dipping sauce of choice! Make them for yourself, or for your next party!!! They’re a real crowd-pleaser!

Grain-Free Soft Pretzels with bowl of mustard.

***


Black banner with red and white writing inviting readers to comment below and share pictures of recipe on instagram.

 ***


CLICK HERE TO SHOP

for ingredients to make Grain-Free Soft Pretzels, or to see recommended pantry items and kitchen gadgets I personally use to make other Crazy For Yuca recipes! 

Check out the yuca/cassava snacks! – All personally taste tested and approved by myself and my  family! For a detailed description of the recommended yuca/cassava chips, see my post The Perfect Yuca Chip!


By ordering recommended products through our website we get a small percentage of the sale which helps to support the maintenance of Crazy For Yuca. There’s absolutely no additional cost to you. Thank you so much for supporting our efforts to bring you the latest yuca/cassava recipes!


Banner inviting readers to subscribe to Crazy For Yuca.


Crazy For Yuca logo


Disclaimer– In Crazy for Yuca I write about my own personal health and diet journey.  My experience and recipes are not to be considered expert advice or suggestive that anyone follow any particular diet protocol. Each person’s body and medical issues are individual and need to be evaluated by a medical professional.  If you have any concerns due to your specific diagnoses, please consult your doctor before eating yuca.

Heart shaped Crazy For Yuca logo

Grain-Free Popovers

Grain-Free Popovers

These Grain-Free Popovers are so light and airy! They’re fun to eat and really hit the spot when you’re craving some bread, but don’t want the grain! They’re especially delicious warm right out of the oven! While most of my Crazy For Yuca recipes are 

Grain-Free Mandel Bread / Biscotti (Kosher for Passover / Otto’s Cassava Flour)

Grain-Free Mandel Bread / Biscotti (Kosher for Passover / Otto’s Cassava Flour)

I call this recipe Mandel Bread / Biscotti because there’s little (if any) difference between these 2 cookies. I want everyone to feel free to enjoy them – no matter one’s heritage, or holiday celebrating. With both Passover and Easter coming within the next week, 

Gluten-Free Grain-Free Banana Bread / Muffins

Gluten-Free Grain-Free Banana Bread / Muffins

Gluten-Free Grain-Free Banana muffins, some with and some without nuts stacked in a pyramid.

I’m making this banana bread as I type up this post, and the incredible aroma as it’s baking has taken over the house! I can’t wait for it to cool off so I can take my blog pictures and dig in!!! Whether made into muffins or loaves, this recipe is the perfect gluten-free, grain-free, nut-free, dairy-free, soy-free, healthy breakfast, snack, or dessert any time!  They’re just sweet enough, without being overly sweet. This banana bread is my husband’s absolute favorite! I like to make a batch, then throw them in the freezer so they’re available any time.

Go Nuts with Gluten-Free Grain-Free Banana Bread / Muffins!

While this recipe is amazing without nuts, adding your favorite nut is a great way to boost the protein, Omega-3 fats, fiber, and minerals in your diet, all while enjoying a scrumptious piece of banana bread or muffin!


Gluten-Free Grain-Free Banana Bread / Muffins are made with

Otto’s Cassava Flour.


If you haven’t tried cassava flour yet, you’re missing out! (FYI – yuca and cassava are different names for the same root vegetable.) Cassava flour is a relatively new flour that has emerged in the gluten-free, Paleo, and autoimmune protocol worlds in recent years. It’s a whole-food, non-GMO flour made simply by drying and grinding the white flesh of the peeled yuca root. Since yuca has a low glycemic index of 46, it will not spike blood sugar the way many other gluten-free flours can. It’s therefore considered safe for diabetics.

It can be used in place of wheat flour in most recipes to create grain-free treats with all the goodness expected of wheat flour. It has a neutral taste and a texture similar to wheat flour (not grainy like some nut flours.) It’s finer than wheat flour; a bit like powdered sugar in that if mixed too vigorously it creates a “flour cloud” over the bowl. It’s dryer than wheat flour, so recipes often need a bit more liquid.


I use Otto’s Cassava Flour for all of my baking since it tastes great, is certified gluten-free, non-GMO and Paleo, and is made upholding the highest standards. See About Cassava (Yuca) Flour for more information.


Click the link below to order your own bag of Otto’s Cassava Flour so you can make scrumptious Gluten-Free Grain-Free Banana Bread or muffins!


Otto’s Naturals 100% Natural Cassava Flour Made from Yuca Root Bag, 2 Pound
2 lb bag of Otto's Cassava Flour.
 

By ordering Otto’s Cassava Flour through our website we get a small percentage of the sale which helps to support the maintenance of Crazy For Yuca. There’s absolutely no additional charge to you. Thank you so much for supporting our efforts to bring you the latest yuca/cassava recipes!


Making Gluten-Free Grain-Free Banana Bread / Muffins

(Full Printer-friendly recipe below)

This recipe makes 20 muffins or 2 loaves

Ingredients:

-2 cups Otto’s Cassava Flour

-2 tablespoons organic coconut flour  (I use NOW Foods Organic Coconut Flour.)

-1 teaspoon baking soda (I typically use Bob’s Red Mill baking soda because they mine their sodium bicarbonate directly from the ground in it’s natural state, while many other brands use a chemical reaction process (1.))

-¼ teaspoon pink Himalayan sea salt (I use pink Himilayan sea salt for all cooking and baking because of its high mineral content.)

-4 cage-free eggs – room temperature  (I use duck eggs since I’m sensitive to chicken eggs. Both chicken and duck eggs work perfectly!)

-2 cups mashed, ripe organic bananas (About 4-5 bananas)

1 cup organic maple syrup -room temperature

-½ cup organic applesauce – no sugar added

-1/3 cup organic coconut oil – melted ( I use Nutiva Organic Coconut oil)

-1 tsp organic vanilla extract

baking cups – If making muffins.

parchment paper – If making loaves

-Optional: Add pecans and/or walnuts – reserving some to sprinkle on top of muffin or loaf.

How nutty are you??

  1. Not nutty at all! Skip the nuts and enjoy your nut-free banana bread
  2. A little nutty.  Add 1 cup chopped, pecans or walnuts.
  3. I’m a total nut! – Add 1 cup each of chopped pecans and chopped walnuts.

Directions:

Preheat oven to 350 degrees.

In a large bowl blend dry ingredients including Otto’s Cassava Flour, coconut flour, baking soda and pink Himalayan sea salt . In a second bowl, combine wet ingredients including eggs, mashed bananas, maple syrup, applesauce, coconut oil, and vanilla. Combine ingredients from the 2 bowls by adding wet ingredients to the dry, then stir just until moistened. (*Over-blending may cause your banana bread to be gummy.)

Gluten-Free Grain-Free Banana Bread / Muffin batter in a silver bowl.

Optional – Add chopped pecans and/or walnuts, stirring just enough to blend.

Spoon batter into muffin tins lined with baking cups or into 2 loaf pans lined with parchment paper.

Optional: Sprinkle additional nuts on top for added crunch and a truly spectacular looking muffin or loaf!

For muffins: Bake at 350 degrees for 25-30 minutes, or until a fork inserted into the center of a muffin comes out clean.

For loaves: Bake at 350 degrees for about 50 minutes.

Notes: These freeze well.


Gluten-Free Grain-Free Banana Bread

Gluten-Free Grain Free Banana Bread sliced in a basket, along with a plate with a slice with a bite taken out of it.


Gluten-Free Grain-Free Banana Muffins (With and Without Nuts)

Gluten-Free Grain Free Banana Muffins, some with and some without nuts in basket.


*****


Invitation to comment below and to share pictures of recipes on CrazyForYuca's instagram.


*****


Gluten-Free Grain-Free Banana Bread / Muffins
Prep Time
10 mins
Cook Time
35 mins
Total Time
45 mins
 

Whether made into muffins or loaves, this recipe is the perfect gluten-free, grain-free, nut-free, dairy-free, healthy breakfast, snack, or dessert any time! They're just sweet enough, without being overly sweet. Go nuts and add pecans and/or walnuts to boost the protein, Omega-3 fats, fiber, and minerals of this delicious treat! Make a batch, then throw them in the freezer so they're available any time.

Course: Breakfast, Dessert, Snack
Servings: 20 muffins or 2 loaves
Author: Lauren from Crazy For Yuca
Ingredients
Ingredients:
  • -2 cups Otto's Cassava Flour
  • -2 tablespoons organic coconut flour
  • -1 teaspoon baking soda
  • -¼ teaspoon pink Himalayan sea salt (I use pink Himilayan sea salt for all cooking and baking because of its high mineral content.)
  • -4 cage-free eggs - room temperature. (I use duck eggs since I'm sensitive to chicken eggs, but both work perfectly!)
  • -2 cups mashed, ripe organic bananas (about 4-5 bananas)
  • -1 cup organic maple syrup - room temperature
  • -½ cup organic applesauce with no added sugar
  • -1/3 cup organic coconut oil - melted
  • -1 teaspoon organic vanilla extract
  • -Optional: Add 1-2 cups pecans and/or walnuts - depending on how nutty you are! (Reserve some or really go nuts with additional pecans and walnuts sprinkled on top!)
Instructions
Directions:
  1. Preheat oven to 350 degrees.
  2. In a large bowl mix together dry ingredients including Otto's Cassava Flour, coconut flour, baking soda and pink Himalayan sea salt until well combined. 

  3. In a second bowl combine eggs, mashed bananas, maple syrup, applesauce, coconut oil, and vanilla. 

  4. Place blended wet ingredients into dry ingredient bowl and stir just until moistened. (*Over-blending may cause your banana bread to be gummy.)

  5. Optional - Add dry roasted pecans and/or walnuts.
  6. Spoon batter into muffin tins lined with baking cups or 2 loaf pans lined with parchment paper. 

  7. If desired, sprinkle additional nuts on top for added crunch and a truly spectacular looking muffin!

  8. Bake muffins at 350 degrees for 25-30 minutes, and loaves for 45-55 minutes, or until a fork inserted into the center comes out clean. 

Recipe Notes

Notes: Freeze well. Defrost quickly at room temperature or in microwave for about 30 seconds.


*****


Subscribe to Crazy For Yuca for free recipes and tips for living happy, healthy and gluten-free delivered right to your inbox. Never miss a recipe!


*****


Here are some links to products I used to make

Gluten-Free Grain-Free Banana Bread / Muffins!


Otto’s Naturals 100% Natural Cassava Flour Made from Yuca Root Bag, 2 Pound
Nutiva Organic, Cold-Pressed, Unrefined, Virgin Coconut Oil from Fresh, non-GMO, Sustainably Farmed Coconuts, 15 Fluid Ounces
Natierra, Himalania Fine Grain Himalayan Pink Salt Shaker, 13 Ounce
NOW Foods Organic Coconut Flour,16-Ounce
 

Bob’s Red Mill Pure Baking Soda — 16 oz (Pack of 2)

Hidden Springs Organic Vermont Maple Syrup, Dark Robust (Formerly Grade B), 16 Ounce

Simply Organic Pure Vanilla Extract, Certified Organic, 4-Ounce Glass Bottle
If You Care Unbleached Large Baking Cups, 60 ct, 3 pk


Disclaimer– In Crazy for Yuca I write about my own personal health and diet journey.  My experience and recipes are not to be considered expert advice or suggestive that anyone follow any particular diet protocol.  Each person’s body and medical issues are individual and need to be evaluated by a medical professional.  If you have any concerns due to your specific diagnoses, please consult your doctor before eating yuca.

Almond Cassava Flour Cookies

Almond Cassava Flour Cookies

Why should the gluten-free be denied scrumptious almond cookies from the Chinese restaurant? (After all, we already can’t have most Chinese food!) My daughter, who is gluten and dairy-free, had a hankering for almond cookies and asked me to create this recipe using cassava flour. 

Apple Cinnamon Pop-Tarts

Apple Cinnamon Pop-Tarts

If you’re anything like me, “Pop-Tarts” were a staple of your childhood. When I was little my mother would leave a box of them in a lower cabinet so my brother and I could get breakfast for ourselves on weekends, and she and my dad 

Guacamole

Guacamole

Cassava Empanada dipped in Guacamole.

 In my opinion, guacamole is the perfect condiment! It’s gluten and dairy-free, full of healthy fats, and is “whole food” at its best. Not to mention it’s creamy and delicious!

Guacamole makes chopped up veggies WAY more fun, and is a perfect pair with many yuca recipes including Yuca Empanadas (pictured above,) Taco Meat in a Cassava Flour Tortilla, Mexican Yuca Pizza, and Garlic Yuca Flatbread. (This pairing makes an amazing gluten-free avocado toast!!)


Taco Meat in a Cassava Flour Tortilla Wrap.

Mexican Yuca Pizza


I’ve always enjoyed having guacamole made fresh at my table at fine Mexican restaurants. That’s where I learned how easy it is to make it at home in just 10 minutes!

I’ve had people tell me they don’t like guacamole, but for some reason they like this recipe. I think it’s because I don’t use cilantro. People tend to either LOVE or HATE cilantro. I’m a hater so I stay away from using it. I’ve been told one’s taste for cilantro is based on environmental exposure to it, yet new research is showing there may be an actual genetic component!  Either way, this cilantro-less guacamole is sure to please.

***

Simply choose ripe avocados (dark green in color and slightly soft when squeezed gently,) cut each in half, then scoop out flesh with a spoon. Place flesh in a bowl, and chop or mash avocado along with diced sweet onion and tomato, salt, garlic powder, and lemon juice. Mix until well blended. That’s all there is to it!

I like my guacamole chunky, but if smooth and creamy is your thing, just place all the ingredients into a food processor and blend for a few seconds until it reaches desired consistency. Enjoy!


Guacamole ingredients in a bowl ready to be blended together.


***

Comment below and let me know what you think of this guacamole. I look forward to your feedback!

 ***

Healthy Eating Tip: Use Pink Himalayan Sea Salt instead of iodized table salt. Table salt is highly processed, which strips away most of its natural mineral content, leaving only sodium. It’s often then bleached, and iodine and anti-clumping agents are added. High quality Himalayan sea salt is said to be over 99% pure and contains at least 84 minerals and trace elements, including calcium, magnesium, potassium, copper and iron, in addition to sodium. Since Western diets are typically deplete of minerals, using Himalayan sea salt is an easy way to get the vital nutrients needed.


5 from 1 vote
Guacamole
Prep Time
10 mins
 

It only takes minutes to have fresh guacamole any time. This guacamole recipe will ruin you for store-bought varieties! It's fresh and creamy, with just the right amount of chunkiness. Enjoy it on Yuca Empanadas, Tacos with Cassava Tortilla Wraps, salads, Garlic Yuca Flatbread, or to jazz up your vegetable platter. 

Course: Appetizer, Salad
Cuisine: Mexican
Author: Lauren from Crazy For Yuca
Ingredients
  • 3 large organic avocado
  • 2 Tbsp organic sweet onion - finely chopped
  • 1 organic tomato - chopped
  • 1-2 lemons - juiced
  • 1/2 tsp Himalayan sea salt. Add more - if needed
Instructions
  1. Cut each avocado in half, remove pit, then scoop out flesh with a spoon. Chop flesh into small cubes.

  2. Place chopped avocado, tomatoes, onion, sea salt, and lemon juice in a large bowl. Mix to fully combine ingrdients with a spoon. Taste test and add additional sea salt if needed. This guacamole is chunky. If smooth guacamole is preferred, blend in a food processor for a minute or two until desired consistency is reached. Enjoy!


*****

Subscribe to Crazy For Yuca to receive free recipes and tips for eating happy, healthy and gluten-free. Join the community and never miss a recipe!


Disclaimer– In Crazy for Yuca I write about my own personal health and diet journey.  My experience and recipes are not to be considered expert advice or suggestive that anyone follow any particular diet protocol.  Each person’s body and medical issues are individual and need to be evaluated by a medical professional.  If you have any concerns due to your specific diagnoses, please consult your doctor before eating yuca.


Gluten-Free? Never Feel Deprived Again!

Gluten-Free? Never Feel Deprived Again!

Welcome to the first post of the new blog Crazy For Yuca! What is yuca??? It’s the key to living happy, healthy and gluten-free!  *****   First, let’s answer the basic question on everybody’s mind  – “What is yuca???”   Yuca (pronounced yoo-ka) is an incredibly 

Garlic Yuca Flatbread

Garlic Yuca Flatbread

Come one, come all! The time has come! Whether you’re following a gluten-free, Paleo, Vegan, or Autoimmune Protocol, there is now a scrumptious flatbread that you can eat without guilt! Who could believe that delicious flatbread can be made simply by boiling some yuca, blending 

The Perfect Yuca Chip!

The Perfect Yuca Chip!

The Perfect Yuca Chip in parchment lined basket.

The Perfect Yuca Chip!

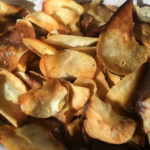
I’ve been busily perfecting my yuca chips! I tried fresh vs. frozen yuca, paper thin vs. slightly thicker slices, pan frying vs. oven baking, and 4 different seasoning variations! If you ask me, they’re all pretty terrific! But if I had to choose a favorite, this recipe using fresh, finely sliced, pan fried yuca is a cut above the rest! These chips are an incredibly satisfying, crispy, salty, gluten-free snack! (I guess it’s no surprise that frying in oil is delicious!) My daughter describes these homemade Yuca Chips as seeming like a cross between a potato chip and a pita chip in consistency, and insists that they’re WAY better than any store bought ones she has tried.

As a kid I remember making homemade potato chips with my mom a few times and they just couldn’t be beat! (Until now!!!!)

I got inspired to buy a mandoline to make these thin, crispy chips (after trying to slice my yuca as thin as possible and really only succeeding in making very thin fries.) Don’t get me wrong – they were DELICIOUS, but not really a thin, crunchy “chip.”

I bought the Oxo Good Grips V-Blade Mandoline Slicer. I chose this one because it was BPA free, had a few different thickness settings, can cut straight slices, crinkle cuts, or julienne strips, has a setting where the blade is safely tucked away, and folds away for easy storage. It was so much fun to use to make The Perfect Yuca Chip!

 Oxo Good Grips V-Blade Mandoline Slicer over cutting board with yuca (cassava) slices.


It helps to have a long handled metal mesh skimmer to flip and remove chips from the pan to protect against getting burned by hot oil. A metal spatula can also be used. If you need one, click link below.


Hiware Stainless Steel Fat Skimmer Spoon – Fine Mesh Food Strainer for Grease and Foam, Japanese Hot Pot Skimmer with Long Handle
 

Hiware Stainless Steel Fat Skimmer Spoon - Fine Mesh Food Strainer for Grease and Foam, Japanese Hot Pot Skimmer with Long Handle

How to make The Perfect Yuca Chip!

Ingredients: (Full printer friendly recipe below)

-1 pound fresh yuca (Fresh yuca can be found in some larger grocery stores, and in Latin and Asian grocery stores.) I always buy a little more than a recipe calls for just in case I find black steaks in the white flesh upon peeling. It’s important to buy very fresh yuca, as it doesn’t last long after harvesting. Make sure fresh roots are firm (no mushy spots.) See: Buying, Storing, and Peeling Fresh Yuca for tips.

avocado oil (I use Chosen Foods 100% Pure avocado oil.) I prefer avocado oil for almost all my cooking because it’s neutral tasting, is full of healthy anti-oxidants, won’t cause systemic inflammation like most vegetable oils do, and has a high smoke point (which makes it ideal for cooking involving high heat like frying.) *Do not use olive oil to fry your yuca chips! See Healthy Eating Tip below for more details. 

pink Himalayan sea salt

-fresh ground black pepper

Have some fun trying different seasoning variations!

Not only can the seasonings be switched up, but the amount used can be customized to accommodate any palate. My family had a ball doing a 4 seasoning variation taste test, and here’s what we concluded:

Trader Joe’s Chile Lime Seasoning – Voted #1 seasoning variation by my family! Everyone agreed that the burst of lime flavor is AWESOME!!! While there’s a hint of chile flavor, it’s extremely mild – not spicy at all. It’s the perfect balance of tangy and zesty!

Trader Joe’s Onion Salt  – Also LOVED by my family as a top choice seasoning variation, and my personal favorite! The combination of onion powder, dried scallions and garlic powder give these a sour cream and onion type taste (a flavor that the two of us who are gluten and dairy-free haven’t experienced in years!) YUMMY!!!

Trader Joe’s Lemon Pepper with a pinch of pink Himalayan salt is a very tasty option. It has a more full bodied flavor than salt and pepper alone, with the added pleasure of a hint of lemon and pepper flavor. Not overpowering at all.

Salt and pepper – We all agreed that yuca chips are delicious with salt and pepper alone. These are a simple classic which highlights the taste of the yuca, which has a delicious hint of sweetness.

Any way you slice them, Yuca Chips are fun to make and to eat! 

***

Fresh yuca looks a bit like an elongated sweet potato with a much thicker peel and a waxy coating (which is added to help preserve its shelf-life.)

Fresh Yuca

One fresh yuca on green cutting board.


Step 1:  Peel fresh yuca. With a very sharp knife or vegetable peeler, fully remove peel. I like to use a knife to remove the majority of the peel and then go over it with a vegetable peeler to get any remaining fragments. See: How to Peel Fresh Yuca for tips and more detailed instructions.

Note: Do not eat raw yuca. Yuca contains a cyanogenic glycoside called linamarin, located mostly in the outer peel. This is why the peel must be removed before yuca is cooked or eaten. Once yuca is peeled and cooked it’s perfectly safe to eat, as these steps eliminate all linamarin. There’s no need for concern; there’s cyanogenic glycoside in many commonly eaten foods, such as almonds, lima beans, flax seeds, bamboo shoots, and apricots.  In small doses, this compound is not only safe, but is beneficial for our health.

See: Getting to Know Yuca (Cassava) for more info.


Peeling YucaPeeling yuca with a knife on green cutting board.

 Peeled YucaFully peeled yuca root.


Step 2: Cut peeled yuca in half (horizontally, so there are 2 equal sized pieces.) 

Step 3: Slice yuca into “chips” using a mandoline. If you don’t have a mandoline, slice yuca with a vegetable peeler, or very sharp knife. The thinner the slice, the crispier the chip! If using a mandolin, put it on the thinnest setting and choose a straight v-blade.

Yuca can either be sliced into circles, or from top to bottom, making long chips!

Oxo Good Grips V-Blade Mandoline Slicer used to slice yuca (cassava) into yuca chips.


Step 4: Place about an inch of avocado oil on the bottom of a large frying pan and heat on high. 

Step 5: Once hot, place yuca slices into avocado oil – do not overlap. (The oil is hot enough when the first yuca slice sizzles upon entering oil.) It works best to pan fry in batches, as chips cook very quickly. *Be careful not to get splattered by hot oil!

Sliced yuca chips frying in oil in frying pan.


Step 6: Flip chips. Pan fry for about 1 minute, until yuca begins to brown and curl up at the edges. Depending on the amount of oil in the pan, flipping chips halfway through may be needed to ensure even browning on both sides. Yuca chips cook very quickly so keep a constant eye on the pan. Flip using a metal spatula or long handled metal mesh skimmer to avoid getting scalded by hot oil.

Flipping yuca chips frying in oil in pan.


Step 7: Once browned, remove yuca chips using metal mesh skimmer or slotted spatula, allowing excess oil to drain back into pan. (Beware – the hot oil might melt plastic utensils!)

Yuca chips frying in pan being scooped out of pan with a spatula.


Step 8: Place chips on paper towel to absorb excess oil.

The Perfect Yuca Chips on paper towel.


Step 9: Immediately sprinkle with salt and pepper, or your favorite seasoning. See recommended seasoning variations below.

My favorite variation is Trader Joe’s Onion Salt – It’s a combination of granulated onion, granulated garlic, minced onion, kosher salt, green onion and dried chives! YUM!!! It just pops these yuca chips to a whole new level!


Pile of Perfect Yuca Chips on parchment paper.


Enjoy this mouth-watering, salty, crunchy, satisfying treat!

The Perfect Yuca Chip in white bowl.


The Perfect Yuca Chip displayed on parchment paper on red tablecloth.


*****

No time to make The Perfect Yuca Chip right now, but want to try them? No problem – I’ve taste tested many brands and listed my top picks with links below! It’s rare to find most brands in stores, but they can be purchased online here.  

Check out these yummy options:

Artisan Tropic Cassava Strips are an excellent, truly classic yuca chip. Very similar to potato chips. They’re made just like I make mine, by thinly slicing the whole yuca root, cooking in oil (they use non-hydrogenated palm oil) and adding sea salt. Cassava Strips are non-GMO, vegan, certified Paleo and gluten-free, contain no preservatives, and are made in a peanut and tree nut-free facility. Click below to check them out.

Artisan Tropic Cassava Strips, Sea Salt, Cooked in Sustainable Palm Oil, Paleo Certified, 4.5 Oz, (2 Pack)


Siete makes AMAZING yuca/cassava chips, which they call Grain Free Tortilla Chips. They come in 3 flavors: sea salt, lime, and nacho. They’re all gluten, dairy, and soy free! I love them all, but my absolute favorite is the lime flavor! The nacho ones taste more like the Herr’s Ketchup Chips that my kids used to be obsessed with than a true nacho flavor, but they’re still delicious. They are made with cassava flour (not sliced, whole cassava root) and then formed into triangle shapes. These chips melt in your mouth, kind of like a Pringle. I love that Siete makes these chips with avocado oil (See healthy eating tip below – as this is the healthiest high heat cooking oil.) Be careful, they’re totally addictive! Here’s a link to a 3 flavor sampler pack, but you can also buy just one flavor.

Siete Grain Free Tortilla Chips, 3 Bag (5 Ounce Each) Sampler of Nacho, Lime, Sea Salt


Cassava Crunch is another awesome yuca/cassava chip! Plant Snacks created these delicious gluten-free, non-GMO, grain & corn free, Paleo, trans fat free chips with no preservatives and no artificial flavors or colors. The ingredients are simply dried yuca/cassava root, sunflower oil, sesame seeds, nutritional yeast and sea salt. These ingredients are mixed together and formed into a square chip (about 1″ square.) They’re salty and crispy with a definite sesame flavor. Very unique and delicious! Check them out by clicking the link below. 

Plant Snacks Cassava Crunch Sea Salt Yuca Root Chips, Grain Free, Gluten Free, No Added Sugar, 5 oz Bags, Pack of 3


Cassava Crunch comes in 5 flavors. Click the link below if you’d like to try them all! (Note: some flavors include dairy.)

Plant Snacks’ Cassava Crunch Sampler Pack – Sea Salt, Beet with Goat Cheese, Cheddar, Kale, Seeds 5 oz, Pack of 5

 
Jans Jalapeno Cassava Chips are the way to go if you like some spice in your life! These chips are made from thinly sliced whole yuca/cassava root cooked in palm oil, with jalapeno seasoning (a mixture of sugar, salt, yeast extract, onion powder, garlic powder, and chilli powder.) I think they taste like barbecue potato chips with an extra kick of spice. These are my husband’s absolute favorite – a true spice lover who puts Frank’s Red Hot on everything! I enjoy them, as long as I have a glass of water nearby. Check out the link below.

Jans Root Chips (Jalapeno Cassava Chips, 3 oz)


By ordering recommended products through links on our website we get a small commission which helps to support the maintenance of Crazy For Yuca. There’s absolutely no additional charge to you. Thank you so much for supporting our efforts to bring you the latest yuca/cassava recipes! 


*****

The Perfect Yuca Chip!
Prep Time
30 mins
Cook Time
15 mins
Total Time
45 mins


Course: Snack
Cuisine: Latin
Servings: 4
Author: Lauren from Crazy For Yuca!
Ingredients
Ingredients
  • 1 pound Fresh Yuca / Cassava - peeled Note: Do not consume raw yuca! As with many foods, proper preparation and cooking is needed to ensure food safety. In order to be consumed, yuca must be fully peeled and cooked. (Link: Don't eat raw yuca)
  • Avocado Oil. (Chosen because of its mild taste and high smoke point - making it a safe oil for frying.)
  • Himalayan Sea Salt - to taste. (I use this salt in all my recipes because it is pure and full of minerals and trace elements - unlike table salt.)
  • Fresh Ground Pepper - to taste
  • Variation: Trader Joe's Garlic Salt
Instructions
  1. With a sharp knife or vegetable peeler, remove bark-like peel from fresh yuca. (See: How to Peel Fresh Yuca

  2. Cut peeled yuca in half horizontally, and soak in a bowl of water for 20 minutes. (This step further removes any remaining linamarin, which will otherwise be eliminated during frying.) Discard water.

  3. If you have a mandoline, put it on the thinnest setting and choose a straight V-blade. Slice peeled yuca into circles, or from top to bottom for long, chips. If you don’t have a mandoline, yuca can be thinly sliced with a vegetable peeler, or very sharp knife. The thinner the slice, the crispier the chip!

  4. Place about an inch of avocado oil on the bottom of a large frying pan and heat on high.

  5. Once hot, place yuca slices into oil - do not overlap. (The oil is hot enough when the first yuca slice sizzles upon entering oil.) It works best to pan fry in batches, as chips cook very quickly. *Be careful not to get splattered by hot oil! 

  6. Pan fry for about 1 minute, until yuca begins to brown and curl up at the edges. Depending on the amount of oil in the pan, flipping the chips halfway through may be needed to ensure even browning on both sides. Yuca chips cook very quickly so keep a constant eye on the pan.

  7. Once browned, remove yuca chips using a metal mesh skimmer or slotted spatula, allowing excess oil to drain back into the pan. (The hot oil might melt plastic utensils.) 

  8. Place chips on paper towel to absorb excess oil.

  9. Immediately sprinkle with pink Himalayan Sea Salt and a pinch of pepper - to taste.

  10. Variation: Immediately sprinkle with Trader Joe's Onion Salt and pink Himalayan sea salt - to taste.

  11. Enjoy!!

Recipe Notes

Variations:  Sprinkle with Trader Joe's Chile Lime Seasoning, Trader Joe's Onion Salt, or Trader Joe's Lemon Pepper. These chips can be seasoned with any spice that you enjoy - so start experimenting!  Comment at the bottom of the post or tag me with your pictures on Instagram @CrazyForYuca to tell me about your perfect chip creation!! 

A word on frying:  If you are like me, frying is like "a four letter word!" You avoid it as part of your healthy lifestyle.  While that is typically true for me, I read a great post by Alton Brown which helped me to make these chips less oily.  (See Alton Brown's post Fry Hard Transcript.)  In a nutshell, he says the keys to frying without absorbing oil into food are to pat food dry before placing into oil, and to fry just until the sizzle stops. While the sizzling/bubbling is happening, moisture is being expelled from the food. Once bubbling stops, moisture and fat are being absorbed by food. SO INTERESTING!! Also, do not cover pan.  Covering causes steam and condensation within pan which will create soggy, oily chips. 

***


Healthy Eating Tip: Start using avocado oil, especially for cooking involving high heat.

Avocado oil has a very neutral flavor and is a healthy addition to both raw and cooked meals. For high heat cooking like frying, it’s critical to use oils with a high smoke point (the temperature at which an oil breaks down under heat.) Avocado oil has the highest smoke point of any cooking oil. It’s able to remain stable at temperatures up to 520 degrees! This is very important, as when cooking oils are heated above their smoke point they degrade into free radicals. This causes systemic inflammation, damage to cell membranes, healthy cholesterol and collagen, and even attacks our DNA! Avocado oil not only doesn’t break down and harm the body in these ways, it actually helps to prevent physical aging and chronic diseases like heart disease, stroke, cancer, and Alzheimers. While many oils increase systemic inflammation in the body, avocado oil helps to decrease inflammation as a result of its high levels of monounsaturated fats, oleic acid, carotenoids, lutein, vitamin E and phytosterols. It has even been shown to increase nutrient absorption. Making the simple swap to avocado oil is a simple step toward greatly improving one’s health (1, 2.I use Chosen Foods 100% Pure Avocado Oil. 

*Never use olive oil for high heat cooking! With its smoke point at 350 degrees, olive oil should only be used in recipes that don’t involve cooking at high temperatures – such as a quick saute, salad dressing, or cold vegetable salad.


Here are some links to products I use to make

The Perfect Yuca Chip!

Chosen Foods 100% Pure Hand-crafted Avocado Oil (33.8-oz Bottle) Pack of 2


OXO Good Grips V-Blade Mandoline Slicer

OXO Good Grips V-Blade Mandoline Slicer
 

Natierra, Himalania Fine Grain Himalayan Pink Salt Shaker, 13 Ounce

Natierra, Himalania Fine Grain Himalayan Pink Salt Shaker, 13 Ounce
 

Trader Jo’e Onion Salt Savory Allium blend Seasoning Salt 2 Oz.

Trader Jo'e Onion Salt Savory Allium blend Seasoning Salt 2 Oz.
Trader Joe’s Chile Lime Seasoning Blend, 2.9 oz
Trader Joe’s Lemon Pepper Seasoning Blend with a Built in Grinder
 

Hiware Stainless Steel Fat Skimmer Spoon – Fine Mesh Food Strainer for Grease and Foam, Japanese Hot Pot Skimmer with Long Handle

Hiware Stainless Steel Fat Skimmer Spoon - Fine Mesh Food Strainer for Grease and Foam, Japanese Hot Pot Skimmer with Long Handle
 

***


Disclaimer– At Crazy for Yuca I write about my own personal health and diet journey.  My experience and recipes are not to be considered expert advice or suggestive that anyone follow any particular diet protocol.  Each person’s body and medical issues are individual and require personal guidance from a medical professional.  If you have any concerns due to your specific diagnoses, please consult your doctor before eating yuca.

Red heart with yellow writing saying "crazy for yuca"

Baked Yuca Fries

Baked Yuca Fries

Making yuca fries is super easy! It’s a perfect recipe to try when first experimenting with yuca (a.k.a. cassava.) These fries are baked in the oven (not fried) so their fat content is low – yet their taste satisfaction is high!! They’re crispy on the