
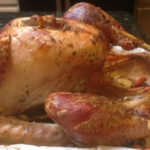
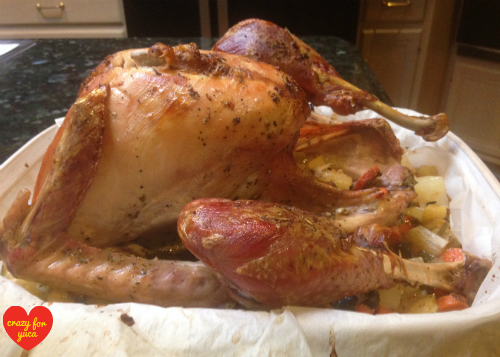
This is not your typical, dry Thanksgiving turkey! This bird is moist and flavorful and is made a day ahead so it can soak up its juices overnight and free you up to enjoy your guests. It makes a scrumptious main meal and side dish all at the same time! Don’t just think of it on Thanksgiving though, this hearty meal is satisfying any time.
I actually still have the piece of note paper from over 20 years ago, where I frantically scribbled down my mom’s turkey recipe after hearing she was flying in on Thanksgiving Day, and I would have to make a turkey for the first time! The directions say: “1:30- Preheat oven. Sprinkle turkey with paprika and garlic powder. Put 1/2 inch of water at the bottom of roasting pan along with sliced onions, neck and giblets. 2:00- Put turkey in oven and tent with aluminum foil. 3:30- Baste and take off tent. 4:30- Take out of oven. Discard giblets. Scrape stuff off the bottom of roasting pan and put into saucepan with water for gravy.” This all seemed very intimidating at the time! The turkey came out looking good, but was kind of dry and tasteless. In my experience, that’s pretty much the way it is with most Thanksgiving turkeys. For years I’d try to enhance the taste by making gravy from a can or package that was full of artificial flavorings.
About 10 years ago, I searched my refrigerator and spice cabinet for anything that might add some new flavor to my boring, dry turkey, and decided to dump a bottle of Italian dressing over it. When it came out of the oven, I reluctantly tasted a tiny piece and was literally bowled over by how good it was! There was a much greater quantity of drippings than usual and it tasted fantastic! Nothing like the greasy, bland drippings I was used to creating. I decided to carve the turkey and soak the meat in the drippings overnight so not a single drop was wasted. WELL, when I served it the next day, I had never gotten so many compliments on anything I had ever cooked! Everyone kept saying how this was nothing like the typical, dry turkey they had come to expect on Thanksgiving. After making my turkey this way for years, the dressing I used stopped being made. Since I started to eat much healthier by that time, cutting out processed foods, I set out to make my own homemade turkey marinade.
I’ve come a long way in my healthy eating journey, and in learning to value putting organic, “real food” ingredients into my body. My turkey recipe has evolved right along with me. This Turkey With Yuca And Carrots is a recipe you can feel good about eating, and serving to guests. It’s super moist and delicious!
***
I must warn you, while everyone loves this turkey, many hesitate to follow my recipe for their Thanksgiving turkey because it breaks from tradition in a number of ways. If you feel this way, feel free to make it any other day of the year.
The first break from Thanksgiving tradition is that this turkey gets cooked the day before it will be eaten, so it can marinate in its own juices overnight. – *The key to creating this moist, flavorful turkey! This is often a deal breaker for those who want to display their turkey in the center of the table and carve it in front of their guests. For me, the purpose of a holiday is to spend quality time with family, not fuss over dinner. I want healthy, delicious food that can be made ahead and enjoyed by everyone. If you share my philosophy, keep reading.
***
Let’s make some Turkey with Yuca and Carrots!
(Full printer-friendly recipe below)
This recipe is super simple.
Vegetable Ingredients:
-1 1/2 pounds yuca (can be fresh or frozen)
-6 organic multi-colored carrots – sliced
-1 large organic onion – chopped
-1 organic leek – chopped
-3 organic garlic cloves – minced
-3 cups filtered water
Note: If using fresh yuca, it must be peeled and boiled before it gets roasted with the rest of the vegetables in this recipe. See: How to Peel Fresh Yuca for step by step instructions. If using frozen yuca, it’s already peeled, cut into pieces, and ready to be boiled.
Vegetable Directions:
-Peel yuca, cut into 3 or 4 pieces, and boil for 15 minutes.
-While yuca is boiling, cut up onion, carrots, leek and garlic.
-Once yuca is boiled, cool, then remove stick-like stem that runs through the center.
-Chop yuca into cubes and place it with the other vegetables at the bottom of a roasting pan that’s covered with parchment paper. (This makes clean up a breeze!)
-Add filtered water

Turkey and Marinade Ingredients:
-organic turkey
–pink Himalayan salt (chosen because of it’s purity and high mineral content)
–garlic powder
Marinade
-1 teaspoon Italian seasoning (I use Primal Palate Amore seasoning – Check out Primal Palate’s high quality, great tasting seasonings by clicking here.)
-1 teaspoon organic dry mustard
-1/2 teaspoon pink Himalayan salt
-1/2 cup red wine vinegar
-1/4 cup avocado oil
-1/4 teaspoon lemon pepper
Turkey Directions:
-Remove the skin from the body of the turkey, leaving skin only on the legs and wings. (When I “tent” my turkey, these parts don’t tend to get full coverage so they need the skin as protection from getting over-cooked and dried out.)
* You may be bothered by the idea of removing the skin, since this is another break from traditional Thanksgiving turkey cooking. I find that the skin adds a significant amount of unwanted greasy fat to the drippings and prevents the marinade from fully incorporating into the turkey breast meat. As long as the turkey is tented during most of its roasting time, the skinless turkey will be perfectly protected. Plus, it will be carved and sitting in the drippings overnight, which will further moisten it. Another difference from traditional turkey roasting is that I suggest placing the turkey right onto the vegetables, not on a rack inside a roasting pan. (To be honest, I’ve never even owned a traditional roasting pan!) I find that the vegetables act as my rack, slightly elevating the turkey, with the meat and vegetables each adding flavor to one another.
-Wash the turkey thoroughly, pat dry and place on top of chopped vegetables (or on a rack inside roasting pan.)
-Season turkey with pink Himalayan salt and garlic powder.
For the marinade:
-Blend Italian seasoning, dry mustard, pink Himalayan salt, lemon pepper, red wine vinegar and avocado oil. I like to put all marinade ingredients into a Mason jar and give it a good shake. Pour marinade over turkey and vegetables.

-Place turkey and vegetables into a preheated oven at 400 degrees for the first half hour – uncovered. Then decrease temperature to 325 and cover turkey, with either a cheesecloth or parchment paper “tent” or with roaster lid.)
*If using parchment paper, be very careful to secure parchment away from the stove coils.
*Note: Do not “tent” turkey with aluminum foil! This has been proven to be a very unhealthy practice. See Healthy Cooking Tip below for more information about the dangers of cooking with aluminum foil.
-Remove “tent” for the last 30 minutes of roasting to allow turkey to brown.
Cooking times vary depending on the size of the turkey. Roast turkey for approximately 15 minutes per pound. Here is a general guideline:
| Weight |
Time |
Temperature |
| 8-12 lbs |
2 ¾ – 4 hours |
325 degrees |
| 12-14 lbs |
3 – 3 ½ hours |
325 degrees |
| 14-18 lbs |
3 ¾ – 4 ¼ hours |
325 degrees |
-Turkey is done when a meat thermometer inserted into the breast or thigh registers 165 degrees and the juices run clear. If juices are still pink, it’s not yet ready. Once fully cooked, remove from oven and let sit for 30 minutes to cool before carving.

-Place turkey on a cutting board. Spoon cooked vegetables from baking dish into a bowl, leaving drippings in the pan. These veggies are so incredibly flavorful!

-Carve turkey and place sliced meat back into the roasting pan with the drippings/gravy (or into any preferred pan for it to sit overnight.) Cover and refrigerate overnight. If meat is not completely covered by juices, rotate meat after a few hours.
-The next day, reheat turkey and vegetables at 375 for 20-30 minutes until warm.

-Serve. This recipe makes a delicious turkey and a scrumptious side dish all at the same time!
Give it a try and leave a comment below. I’d love to know what you think!
***
Healthy Eating Tip: Ditch aluminum foil with all your cooking!
I know, you don’t want to hear that there’s something else you need to cut out of your life to stay healthy!!! You, and everyone you know, has been using aluminum foil for as long as you can remember. How can it be bad? Unfortunately, foil has been PROVEN to leach aluminum into food, with greater leaching in higher heat, with acidic solutions (like those involving tomatoes, lemon, and vinegar,) and with foods containing added spices. (1, 2) I don’t know about you, but that includes pretty much everything I cook!!! Aluminum foil is only considered safe for storage of cold food. The World Health Organization determined a safe daily limit of aluminum intake, but most people take in much more. This is likely the result of aluminum in antacids, vaccines, antiperspirants, drinking water, and the use of aluminum pans for cooking. Why should we care about aluminum exposure? The aluminum that is not excreted by the body interferes with the digestion of calcium, phosphorus, and fluoride, can result in osteoporosis, liver and kidney damage, and neurodegenerative diseases like Alzheimer’s and Parkinsons. Aluminum has also been associated with colic, sleep disturbance, anemia, and speech problems. With all the exposure to aluminum that we can’t control in our environment, why knowingly expose ourselves to greater risk with the use of aluminum foil? Instead, use glass or ceramic cookware with lids or parchment paper. Parchment is a perfectly safe, non-toxic liner for baking. It has a non-stick surface, so no additional oil is needed to prevent food from sticking to the pan. Parchment paper is the mess-free, time-saving solution to healthy cooking and baking.
***

***
***
Thanksgiving Turkey With Yuca and Carrots
This is not your typical, dry Thanksgiving turkey! This bird is moist and flavorful and is made a day ahead so it can soak up its juices overnight and free you up to enjoy your guests. It makes a scrumptious main meal and side dish all at the same time! Don’t just think of it on Thanksgiving though, this hearty meal is satisfying any time.
Organic, Free-Range Turkey (10 lb)
- pink Himalayan salt
- garlic powder
Vegetables
- 2 whole yuca or 1 bag frozen yuca (1 1/2 lbs.) (If using fresh yuca, it must be peeled and boiled before it can be roasted with the other vegetables.)
- 1 large organic onion – chopped
- 1 organic leek – chopped
- 6 organic multi-colored carrots – sliced
- 3 cloves organic garlic – minced
- 3 cups filtered water
Marinade
- 1/4 cup avocado oil
- 1/2 cup red wine vinegar
- 1 tsp Italian seasonings
- 1 tsp dry mustard
- 1/2 tsp pink Himalayan salt
- 1/4 tsp lemon pepper
Yuca and Carrots
-
*If using fresh yuca (cassava) it must first be peeled and boiled before adding it to the rest of the vegetables in this recipe. See About Yuca: How to Peel Fresh Yuca for step by step directions. Frozen yuca is already peeled, but must also first be boiled.
-
Bring a large saucepan of water to a boil. Add peeled fresh or frozen yuca, return to a boil and cook for 15 minutes until fork tender. Do not over-cook.
-
While yuca is boiling, chop onions, leeks, carrots, and garlic cloves. Place them on the bottom of roasting pan that is covered with parchment paper. (The parchment makes cleanup a breeze!)
-
Once yuca is fork tender, drain water and allow to cool.
-
Once cool enough to handle, place each piece of yuca on a cutting board and cut in half vertically and remove the stick-like stem that runs through the center.
-
Chop yuca into cubes and place in roasting pan with the other vegetables.
-
Pour filtered water over vegetables in pan.
Turkey
-
Remove the skin from the body of the turkey, leaving skin only on the legs and wings.
-
Wash turkey thoroughly, pat dry, and place on top of the cut-up vegetables.
-
Pour 2 cups of filtered water directly into the pan with the vegetables.
-
Sprinkle pink Himalayan salt and garlic powder over turkey.
Marinade
-
Blend ground mustard, Italian seasonings, salt, pepper, vinegar and oil. Pour directly over turkey and vegetables.
-
Place into a preheated oven set to 400 degrees for the first half hour.
-
Then decrease temperature to 325 and cover/tent the turkey either with the roaster lid, cheesecloth, or parchment paper (ensuring that paper is securely placed away from burner coils.)
-
Remove cover for the last 30 minutes of roasting to allow turkey to brown.
-
Turkey is ready when a meat thermometer inserted into the breast or thigh reads 165 degrees and the juices run clear.
-
When turkey is done, remove from oven and allow to sit 30 minutes before carving.
-
Move turkey to a cutting board and put cooked vegetables into a bowl for storage.
-
Carve turkey, placing sliced meat back into roasting pan with the drippings/gravy (or into any preferred pan for storage.) Cover and refrigerate overnight. If meat is not completely covered by juices, rotate meat after a few hours.
-
The next day, reheat turkey and vegetables at 375 for 20-30 minutes until warm.
-
Serve this delicious main meal and side dish!
***
Check out yuca/cassava snacks and goodies as well as pantry items and kitchen gadgets I use to make Crazy For Yuca recipes in my clean kitchen?
***

Disclaimer– In Crazy for Yuca I write about my own personal health and diet journey. My experience and recipes are not to be considered expert advice or suggestive that anyone follow any particular diet protocol. Each person’s body and medical issues are individual and need to be evaluated by a medical professional. If you have any concerns due to your specific diagnoses, please consult your doctor before eating yuca.


