
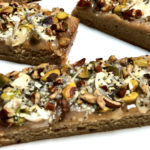
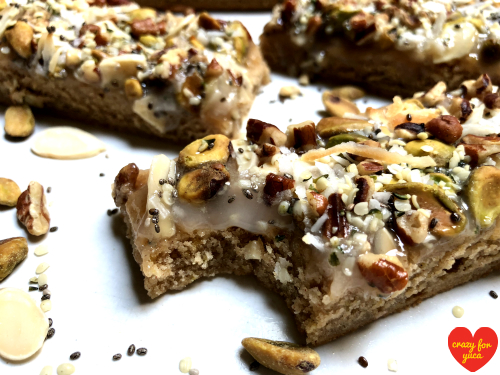
What do you get when you take cassava flour and a bunch of nuts and seeds? Delicious, nutritious Paleo Nut and Seed Bars!!!! These bars have just enough sweetness, without being overly sweet. Cassava flour is a low-glycemic, non-inflammatory starch, while nuts and seeds provide an excellent source of healthy fats, complex carbohydrates, protein, vitamins, minerals, fiber, and immune boosting phytonutrients! Try the nuts and seeds suggested, or choose your own favorites! These nutrient dense Paleo Nut and Seed Bars are perfect for a snack, dessert, breakfast or bunch. With all the ready-made bars out there claiming to be healthy (which are actually often full of chemicals and other processed ingredients) it’s nice to know there’s a truly healthy, scrumptious bar that’s quick and easy to make!
These bars can be frozen, and pulled out whenever needed. They’re even awesome right out of the freezer! No defrosting needed!!!

Let’s make Paleo Nut and Seed Bars!
Makes 12 bars
*Printer-friendly recipe below*
Ingredients for the cookie crust:
-2 1/4 cups Otto’s Cassava Flour
-3 organic, cage-free eggs (I use duck eggs, but chicken eggs can also be used)
-2/3 cup organic coconut oil – melted
-3/4 cup organic maple syrup
-2 teaspoons pure vanilla extract
-1 tablespoon ground cinnamon
-2 teaspoons xantham gum
-1 teaspoon pink Himalayan salt
-Optional: parchment paper (I prefer lining baking dishes with parchment for toxin-free, non-stick baking, and easy clean up.)

Topping ingredients:
–Organic Sweetened Condensed Coconut Milk (I use Let’s Do Organic brand which is Non-dairy, Vegan, Gluten-free, and Kosher)
-1/2 cup Unsalted, Dry Toasted Sliced Almonds (I use Trader Joe’s brand)
-1/2 cup Dry Roasted & Unsalted Pistachio Nutmeats (I use Trader Joe’s brand)
-1/2 cup Unsalted Dry Toasted Pecan Pieces (I use Trader Joe’s brand)
-1/3 cup Organic Unsweetened Shredded Coconut (I use Trader Joe’s brand)
-1-2 tablespoons Organic Chia Seeds (I use Trader Joe’s brand)
-1-2 tablespoons Raw Shelled Hemp Seed (I use Trader Joe’s brand)
I’m clearly a big fan of Trader Joe’s!! (lololol) You just can’t beat their prices, quality, and customer service!
*Note: Don’t be overly concerned with the brands, types, or amounts of nuts and seeds I used. These bars will taste great with any nuts and seeds you have on hand in any amounts you enjoy.
Need Otto’s Cassava Flour? Click here to check it out!

For more information on baking with cassava flour click here: Getting to Know Cassava (Yuca) Flour
To discover all the nutrition benefits of eating yuca click here: Yuca (Cassava) Nutrition Facts
Need Sweetened Condensed Coconut Milk? Click here to order online

Note: No need to run to the store! Many non-perishable ingredients listed above can be purchased by simply clicking on the ingredient within the recipe.
By ordering recommended products through links on our website we get a small commission which helps to support the maintenance of Crazy For Yuca. There’s absolutely no additional charge to you. Thank you so much for supporting our efforts to bring you the latest yuca/cassava recipes!
Instructions for cookie crust:
Preheat oven to 375 degrees.
In a large bowl, blend Otto’s Cassava Flour, pink Himalayan salt, cinnamon, and xantham gum.
In a second bowl, blend maple syrup, melted coconut oil, eggs, and vanilla.
Add wet ingredients to dry ingredient bowl and mix just until fully combined. *Do not over-mix or cookie crust may come out gummy.
Line a 9×11 inch baking pan with parchment paper. (This step is optional, but allows for easy clean up, as well as non-toxic, non-stick baking without the need to grease the pan.) Choose a baking pan that’s deep enough to hold the 3/4″ crust as well as the toppings which will be added after initial baking.
Spoon dough into parchment lined pan and press down so dough forms an even cookie crust about 3/4″ thick.
Dough pressed to bottom of pan to form cookie crust – before baking
Bake at 375 degrees for 20-25 minutes until edges become slightly brown and a fork stuck into center comes out clean.
Baked cassava flour cookie crust. Notice crust thickness – about 3/4″
Remove from oven, but keep oven on.
Add toppings:
While carefully handling hot pan with oven mitts, spread Organic Sweetened Condensed Coconut milk on top of cookie crust. (*Note: No need to use the entire can unless you desire a very sweet bar. Use just enough to cover cookie crust.) This will be the “glue” that holds the toppings on.
Scatter sliced almonds, pecan pieces, pistachios, shredded coconut, hemp and chia seeds over the sweetened condensed coconut milk, trying to cover entire cookie crust. It’s fine for nuts and seeds to overlap.
Place back into oven for an additional 10 minutes until toppings adhere to cookie crust.
Allow to cool before cutting into 12 bars.
Enjoy!

Bars can also be cut into 24 bites if a smaller treat is desired.


For yuca snacks, pantry items, and kitchen gadgets I personally use to make Crazy For Yuca recipes in my own kitchen.

Have you tried Primal Palate’s Organic Seasonings? They have some truly awesome blends!!!
Click below to check them out. Delish!!!


Paleo Nut and Seed Bars
What do you get when you take cassava flour and a bunch of nuts and seeds? Delicious, nutritious Paleo Nut and Seed Bars!!!! Cassava flour is a low-glycemic, non-inflammatory starch, while nuts and seeds provide an excellent source of healthy fats, complex carbohydrates, protein, vitamins, minerals, fiber, and immune boosting phytonutrients! Try the nuts and seeds suggested, or choose your own favorites! These nutrient dense Paleo Nut and Seed Bars are perfect for a snack, dessert, breakfast or bunch. It’s nice to know there’s a truly healthy, scrumptious bar that’s quick and easy to make!
Ingredients for cookie crust
- 2 1/4 cups Otto's Cassava Flour
- 3 organic cage-free eggs (I use duck eggs, but chicken eggs can also be used)
- 2/3 cup organic coconut oil – melted
- 3/4 cup organic maple syrup
- 2 teaspoons pure vanilla extract
- 1 tablespoon ground cinnamon
- 2 teaspoons xantham gum
- 1 teaspoon pink Himalayan salt
- Optional: parchment paper. I prefer lining baking dishes with parchment for toxin-free, non-stick baking, and easy clean up.
Topping ingredients
- 1 can Organic Sweetened Condensed Coconut Milk (I use Let's Do Organic brand which is Non-dairy, Vegan, Gluten-free, and Kosher)
- 1/2 cup Unsalted, Dry Toasted Sliced Almonds (I use Trader Joe's brand)
- 1/2 cup Dry Roasted & Unsalted Pistachio Nutmeats (I use Trader Joe's brand)
- 1/2 cup Unsalted Dry Toasted Pecan Pieces (I use Trader Joe's brand)
- 1/3 cup Organic Unsweetened Shredded Coconut (I use Trader Joe's brand) 1-2 tablespoons Organic Chia Seeds (I use Trader Joe's brand) -1-2 tablespoons Raw Shelled Hemp Seed (I use Trader Joe's brand)
- 1-2 tablespoons Organic Chia Seeds (I use Trader Joe's brand)
- 1-2 tablespoons Raw Shelled Hemp Seed (I use Trader Joe's brand)
Instructions for cookie crust
-
Preheat oven to 375 degrees.
-
In a large bowl, blend Otto’s Cassava Flour, pink Himalayan salt, cinnamon, and xantham gum.
-
In a second bowl, blend maple syrup, melted coconut oil, eggs, and vanilla.
-
Add wet ingredients to dry ingredient bowl and mix just until fully combined. *Do not over-mix or cookie crust may come out gummy.
-
Line a 9×11 inch baking pan with parchment paper. (This step is optional, but allows for easy clean up, as well as non-toxic, non-stick baking without the need to grease the pan.) Choose a baking pan that’s deep enough to hold the 3/4″ crust as well as the toppings which will be added after initial baking.
-
Spoon dough into parchment lined pan and press down so dough forms an even cookie crust about 3/4″ thick.
-
Bake at 375 degrees for 20-25 minutes until edges become slightly brown and a fork stuck into center comes out clean.
-
Remove from oven, but keep oven on.
Add toppings:
-
While carefully handling hot pan with oven mitts, spread Organic Sweetened Condensed Coconut milk on top of cookie crust. (*Note: No need to use the entire can unless you desire a very sweet bar. Use just enough to cover cookie crust.) This will be the “glue” that holds the toppings on.
-
Scatter sliced almonds, pecan pieces, pistachios, shredded coconut, hemp and chia seeds over the sweetened condensed coconut milk, trying to cover entire cookie crust. It’s fine for nuts and seeds to overlap.
-
Place back into oven for an additional 10 minutes until toppings adhere to cookie crust.
-
Allow to cool before cutting into 12 bars.
-
Enjoy!
These bars freeze perfectly! Bake, cool, then throw in the freezer for a ready-made treat any time!
Not an Amazon Prime member yet?
Try it free for 30 days by clicking here!
Disclaimer– In Crazy for Yuca I write about my own personal health and diet journey. My experience and recipes are not to be considered expert advice or suggestive that anyone follow any particular diet protocol. Each person’s body and medical issues are individual and need to be evaluated by a medical professional. If you have any concerns due to your specific diagnoses, please consult your doctor before eating yuca.


