Tag: cookies

Paleo Cassava Flour Hamantaschen (Gluten-free, Grain-free, Dairy-free!)

Paleo Cassava Flour Hamantaschen (Gluten-free, Grain-free, Dairy-free!)

Have you ever tried Hamantaschen??? They’re the wonderful, triangle shaped pastries traditionally eaten on the Jewish holiday of Purim! Hamantaschen are named for Haman, the villain in the story of Purim. I thought it would be fun to make a gluten, grain, and dairy-free version 

Chocolate Chip Peppermint Brownies (Grain-Free, Gluten-Free, Dairy-Free!)

Chocolate Chip Peppermint Brownies (Grain-Free, Gluten-Free, Dairy-Free!)

    Looking for a scrumptious, fudgy, brownie recipe? Look no further! These Chocolate Chip Peppermint Brownies are not only AWESOME, they’re gluten, grain, dairy, and soy-free! The peppermint adds an extra holiday feel, but these can be made any time of year! Not a 

Chocolate SunButter Pinwheel Cookies (Gluten-Free, Dairy-Free, Nut-Free)

Chocolate SunButter Pinwheel Cookies (Gluten-Free, Dairy-Free, Nut-Free)

3 Chocolate SunButter Pinwheel Cookies on white plate on red and white striped cloth

Everything is awesome with chocolate – am I right??? These Chocolate SunButter Pinwheel Cookies are a variation of my Strawberry Almond Butter Pinwheel Cookies (which are great even without chocolate!) Not only is this variation gluten, grain, dairy, and soy-free, but can be made nut-free as well! These Pinwheel Cookies are made with Pascha Chocolate, a brand known for their high quality, allergen-free chocolate, and SunButter, which is simply sunflower seeds pulverized into a creamy spread. Rolled into a “pinwheel” design, then topped with roasted sunflower seeds (or nuts,) these cookies are not only scrumptious, they’re full of healthy, “real food” ingredients! Fun, delicious, and a gorgeous treat to serve for your next brunch, or as a dessert any time!

*Any nut butter can be used instead of SunButter if nuts are preferred and tolerated.

Plate full of Chocolate SunButter Cookies.

Let’s make Chocolate SunButter Pinwheel Cookies

*Printer-friendly recipe below*

Click on any needed non-perishable ingredient listed below to order online:

Ingredients for cassava flour dough:

-1 1/2 cups Otto’s Cassava Flour

-2 tablespoons organic 100% maple syrup

-1 organic, cage-free egg (I use duck eggs since I’m sensitive to chicken eggs, but either can be used.)

-1/2 teaspoon baking soda (I use Bob’s Red Mill)

-1/2 teaspoon xanthan gum (I use Bob’s Red Mill.)

-1 teaspoon pink Himalayan salt

-1/2 cup Spectrum Organic Vegetable Shortening

-1/2 cup filtered water

parchment paper

I use Otto’s Cassava Flour for all of my grain-free baking!

It’s available in small specialty markets or online here.

Otto’s Naturals 100% Natural Cassava Flour Made from Yuca Root Bag, 2 Pound
Bag of Otto's Cassava Flour

What makes this crust so flakey and delicious?

Spectrum Organic Vegetable Shortening. Click picture below to check it out:


Spectrum Organic Vegetable Shortening.

Ingredients for filling:

-1/2 cup Organic SunButter (a nut-free, creamy spread made from pulverized sunflower seeds.) *Almond or peanut butter can also be used if nuts are tolerated.

-1/4 cup sunflower seeds. (I use Trader Joe’s Roasted, Unsalted Sunflower Seeds.)

-1 teaspoon cinnamon – divided (I use Primal Palate Cinnamon.)

-1/2 cup melted chocolate. (I use Pascha Organic Dark Chocolate Baking Chips – either 55% cacao or 85% depending on the palate of my audience.) The higher the cacao, the less sweet the cookie. 55% is most typical of the sweetness of the average chocolate chip. Pascha chocolate chips even come in 100% cacao!

Pascha Organic Allergen-Free Dark Chocolate Chips – 55%, 85% and 100% Cacao

Bag of Pascha Organic Dark Chocolate Chips 55% Cacao Semi-Sweet.

Pascha Organic Dark Chocolate Chips 85% Cacao Semi-Sweet. Pascha Organic Dark Chocolate Chips 100% Cacao Semi-Sweet.

Topping ingredients:

-1 organic cage-free egg (for an egg wash.) Whisk, then brush over rolled-up cookies to give them a golden color when baked.

-1/4 cup sunflower seeds  (I use Trader Joe’s Roasted, Unsalted Sunflower Seeds.)

-1/4 teaspoon cinnamon (I use Primal Palate Cinnamon.)

Click below to explore Primal Palate Organic Cinnamon and other amazing seasoningsPrimal Palate Organic Seasoning

Five Chocolate SunButter Pinwheel Cookies spiral side up on white plate.

To make cassava flour dough: In a large bowl, blend Otto’s Cassava Flour, baking soda, xantham gum, and salt. In a second bowl, whisk egg, then add organic maple syrup and water. Combine contents of the two bowls. Add Spectrum Organic Vegetable Shortening and blend until a dough is formed. Once mixing with a spoon becomes too difficult, use hands to fully incorporate ingredients. (A stand mixer can also be used.)

A cassava flour dough ball using Otto's Cassava Flour.

Making dough into Pinwheel Cookies: Divide dough into 2 equal balls. Roll out each dough ball between 2 pieces of parchment paper to form the base of the Pinwheel Cookies.

Rolled out dough between 2 pieces of parchment paper.

Spread half of the Organic SunButter (1/4 cup) on top of each piece of rolled-out dough, leaving a 1/2 inch plain edge along one side. (This will prevent filling from overflowing over the top of the pastry when being rolled up.)

Place half of the melted chocolate (1/4 cup) directly on top of the Sunbutter for each of the two rolled-out pieces of dough.

Spreading SunButter and melted Pascha Organic Dark Chocolate chips onto rolled out dough.

Sprinkle each rolled-out dough with half of the cinnamon, and half the roasted sunflower seeds (or nuts.)

Starting with the end where the SunButter and chocolate were spread right up to the edge, tightly roll dough from one end to the other like a jelly roll. I find it helpful to lift parchment paper to guide the dough. *Make sure to roll up your pinwheel cookies before allowing the chocolate to dry and become stiff.

Rolling up Chocolate SunButter Pinwheel Cookies.

Ensure that pinwheel log is rolled-up as tight as possible (no air within the log.)

Tightly roll Chocolate SunButter Pinwheel Cookie log

Wrap Chocolate SunButter Pinwheel Cookie logs tightly in either parchment or plastic wrap and place in freezer for one hour. (I prefer using the same parchment I just used to roll out dough. This prevents waste as well as provides a non-toxic wrap for my logs as compared to plastic wrap.) Placing Pinwheel logs into the freezer is needed to firm up ingredients so they will hold their shape during slicing into individual cookies. This will enable the creation of the pinwheel design. If sliced at room temperature, layers blend together during slicing. If frozen for longer than 1 hour, dough becomes brittle and crumby during slicing. If this occurs, simply leave log out on the counter for a few minutes before continuing to slice.

Chocolate SunButter Pinwheel Cookie log wrapped in parchment paper.

Remove logs from freezer, unwrap and place on cutting board. Use a sharp knife to slice each log into 12 Chocolate SunButter Pinwheel Cookies. Test readiness for slicing by starting at one end (since each end is unlikely to form a perfect pinwheel design.) It’s the proper temperature for slicing when a sharp knife easily slices through log without the dough crumbling or log losing its shape.

Slicing Chocolate SunButter Pinwheel cookie logs

Place Pinwheel Cookies onto a cookie sheet lined with parchment paper. (The same piece of parchment can be wiped clean and re-used.)

Unbaked Chocolate SunButter Pinwheel Cookies on cookie sheet lined with parchment.

Whisk an egg and brush top of each cookie with egg wash. Sprinkle with cinnamon and top with sunflower seeds.

Lay each cookie down, pinwheel design facing up (and down) during baking.

Place in a preheated oven and bake at 350 degrees for 20-25 minutes, until edges begin to brown.

Enjoy as a delectable dessert or as a pastry at your next brunch!

Baked Chocolate SunButter Pinwheel Cookies.

These Chocolate SunButter Pinwheel Cookies freeze well – to be honest my husband and I love eating them right out of the freezer – FROZEN!

Chocolate SunButter Pinwheel Cookies in a basket on red cloth.

By ordering recommended products through our website we get a small percentage of the sale which helps to support the maintenance of Crazy For Yuca. There’s absolutely no additional charge to you, and shipping is always free. Thank you so much for supporting our efforts to bring you the latest yuca/cassava recipes!

5 from 1 vote
Chocolate SunButter Pinwheel Cookies
Prep Time
1 hr 30 mins
Cook Time
25 mins
Total Time
1 hr 55 mins
 

Everything is awesome with chocolate - am I right??? These Chocolate SunButter Pinwheel Cookies are a variation of my Strawberry Almond Butter Pinwheel Cookies (which are great even without chocolate!) Not only is this variation gluten, grain, dairy, and soy-free, but can be made nut-free as well! They're made with Pascha Chocolate, a brand known for their high quality, allergen-free chocolate, and SunButter, which is simply sunflower seeds pulverized into a creamy spread. (Any nut butter can also be used if nuts are tolerated.) Rolled into a "pinwheel" design, then topped with roasted sunflower seeds (or nuts,) these cookies are not only scrumptious, they're full of healthy, "real food" ingredients! Fun, delicious, and a gorgeous treat to serve for your next brunch, or as a dessert any time!

Course: brunch, Dessert, Snack
Cuisine: dairy-free, gluten-free, grain-free, nut-free, soy-free
Keyword: cookie
Servings: 24
Author: Lauren from Crazy For Yuca
Ingredients
Ingredients for cassava flour dough:
  • 1 1/2 cups Otto's Cassava Flour
  • 2 tablespoons organic 100% maple syrup
  • 1 organic cage-free egg (I use duck eggs since I'm sensitive to chicken eggs, but either can be used.)
  • 1/2 teaspoon baking soda (I use Bob's Red Mill)
  • 1/2 teaspoon xantham gum (I use Bob's Red Mill)
  • 1 teaspoon pink Himalayan salt
  • 1/2 cup Spectrum Organic Vegetable Shortening
  • 1/2 cup filtered water
  • parchment paper
Ingredients for filling:
  • 1/2 cup Organic SunButter - divided (a nut-free, creamy spread made from pulverized sunflower seeds. *Almond or peanut butter can also be used if nuts are tolerated.)
  • 1/4 cup sunflower seeds - divided (I use Trader Joe's Roasted, Unsalted Sunflower Seeds.)
  • 1 teaspoon cinnamon - divided (I use Primal Palate Cinnamon.)
  • 1/2 cup melted chocolate - divided (I use Pascha Organic Dark Chocolate Baking Chips - either 55% cacao or 85% depending on the palate of my audience. The higher the cacao, the less sweet the cookie.)
Topping ingredients:
  • 1 organic cage-free egg (for an egg wash. Whisk, then brush over rolled-up cookies to give them a golden color when baked.)
  • 1/4 cup sunflower seeds (I use Trader Joe's Roasted, Unsalted Sunflower Seeds.)
  • 1/4 teaspoon cinnamon (I use Primal Palate Cinnamon.)
Instructions
To make cassava flour dough:
  1. In a large bowl, blend Otto's Cassava Flour, baking soda, xanthan gum, and salt. 

  2. In a second bowl, whisk egg, then add organic maple syrup and water.

  3. Combine contents of the two bowls, then add Spectrum Organic Vegetable Shortening. Blend until a dough is formed. (Once mixing with a spoon becomes too difficult, use hands to fully incorporate ingredients. A stand mixer can also be used.)

Making Dough into Pinwheel Cookies:
  1. Divide dough into 2 equal balls. Roll out each dough ball between 2 pieces of parchment paper to form the base of the Pinwheel Cookies.

  2. Spread half of the Organic SunButter (1/4 cup) on top of each piece of rolled-out dough, leaving a 1/2 inch plain edge along one side. (This will prevent filling from overflowing over the top of the pastry when being rolled up.)

  3. Place half of the melted chocolate (1/4 cup) directly on top of the Sunbutter for each of the two rolled-out pieces of dough.

  4. Sprinkle each rolled-out dough with half of the cinnamon, and half the roasted sunflower seeds (or nuts.)

  5. Starting with the end where the SunButter and chocolate were spread right up to the edge, tightly roll dough from one end to the other like a jelly roll. I find it helpful to lift parchment paper to guide the dough. 

    Note: Make sure to roll up your pinwheel cookies before allowing the chocolate to dry and become stiff. Ensure that pinwheel log is rolled-up as tight as possible (no air within the log.)

  6. Wrap Chocolate SunButter Pinwheel Cookie logs tightly in either parchment or plastic wrap and place in freezer for one hour. 

  7. Remove logs from freezer, unwrap and place on cutting board. Use a sharp knife to slice each log into 12 Chocolate SunButter Pinwheel Cookies. Test readiness for slicing by starting at one end (since each end is unlikely to form a perfect pinwheel design.) It's the proper temperature for slicing when a sharp knife easily slices through log without the dough crumbling or log losing its shape.

  8. Place Pinwheel Cookies onto a cookie sheet lined with parchment paper. 

  9. Whisk an egg and brush top of each cookie with egg wash. Sprinkle with cinnamon and top with sunflower seeds.

  10. Lay each cookie down, pinwheel design facing up (and down) during baking.

  11. Place in a preheated oven and bake at 350 degrees for 20-25 minutes, until edges begin to brown.

  12. Enjoy as a delectable dessert or as a pastry at your next brunch!

Disclaimer– At Crazy for Yuca I write about my own personal health and diet journey.  My experience and recipes are not to be considered expert advice or suggestive that anyone follow any particular diet protocol.  Each person’s body and medical issues are individual and need to be evaluated by a medical professional.  If you have any concerns due to your specific diagnoses, please consult your doctor before eating yuca.

Paleo Nut and Seed Bars

Paleo Nut and Seed Bars

What do you get when you take cassava flour and a bunch of nuts and seeds? Delicious, nutritious Paleo Nut and Seed Bars!!!! These bars have just enough sweetness, without being overly sweet. Cassava flour is a low-glycemic, non-inflammatory starch, while nuts and seeds provide 

Almond Cassava Flour Cookies

Almond Cassava Flour Cookies

Why should the gluten-free be denied scrumptious almond cookies from the Chinese restaurant? (After all, we already can’t have most Chinese food!) My daughter, who is gluten and dairy-free, had a hankering for almond cookies and asked me to create this recipe using cassava flour. 

Chocolate Cherry Chunk Cassava Flour Cookies

Chocolate Cherry Chunk Cassava Flour Cookies

A stack of 8 Chocolate Cherry Chunk Cassava Flour Cookies.

This is no ordinary chocolate chip cookie! While it has chocolate chips, it also has dried cherries, cinnamon, and is made from naturally gluten-free cassava flour! They’re soft-baked, with a melt-in-your-mouth crumbly texture, and just enough maple syrup sweetness. These are my go-to cookie when I need to bake a quick, easy treat for guests. They never disappoint!

Cassava flour is not only gluten-free, it’s grain-free, nut-free, soy-free, Paleo, Vegan, Autoimmune Protocol friendly, non-GMO, and full of whole-food goodness! If you haven’t tried it yet, these simple to make Chocolate Cherry Chunk Cassava Flour Cookies are a great place to start!

To learn more about baking with cassava flour see: Getting to Know Cassava (Yuca) Flour.

While cassava flour is very similar to wheat flour, it can be dryer. It, therefore, needs a greater amount of liquid than the same recipe would if wheat flour were being used. I tweaked this recipe at least 6 times before I found the right combination of cassava flour, coconut oil, and maple syrup, leading to this soft-baked, yet firm cookie, with just the right amount of sweetness.  I always create recipes with the least possible amount of sweetener required for it to be delicious (since I’m pre-diabetic.) Based on the 6 cookies I felt compelled to eat the day I came up with this version, I think I got it right! But feel free to add a bit more maple syrup or chocolate chips if you enjoy a very sweet cookie.

I use Otto’s Cassava Flour for all of my baking.

Click below to purchase Otto’s Cassava Flour online here! 


Otto’s Naturals 100% Natural Cassava Flour Made from Yuca Root Bag, 2 Pound
By ordering Otto’s Cassava Flour and other recommended products through our website we get a small commission which helps to support the maintenance of Crazy For Yuca. There’s absolutely no additional cost to you. All recommended products are ones that I use in my own kitchen. Thank you so much for supporting our efforts to bring you the latest yuca/cassava recipes!

 ***

A common complaint in the gluten-free community is that gluten-free versions of a favorite food don’t taste the same as the gluten-containing food one is used to. Because of this fact, I recommend making something totally new, instead of trying to re-create a beloved food. Gluten-free food is AWESOME! It’s just a little different. Finding new, delicious meals and treats to add to one’s repertoire makes a gluten-free lifestyle truly enjoyable, without any sense of deprivation!

I think we can all agree that no cassava flour, gluten-free, grain-free, dairy-free chocolate chip cookie is going to taste EXACTLY like a classic Toll House Chocolate Chip Cookie – so why try??? It’s just going to be a disappointing, lesser cookie! Am I right???

That’s why I set out to create a cassava flour cookie that contained chocolate chips, (because I have no plan to give up chocolate chips!) but is its own unique cookie creation. A cookie that stands on its own! A cookie that no one thinks is trying to be a typical chocolate chip cookie!

These Chocolate Cherry Chunk Cassava Flour Cookies truly achieve that goal! They have just the right amount of cinnamon, which pairs perfectly with the bursts of chocolate from the chips! The sweet, chewy cherries add an unexpected twist that puts these cookies in a class by themselves!

These cookies freeze perfectly! They can be made in advance and pulled out whenever company drops by. Just leave them on the counter for an hour and they’re like fresh baked cookies again! If I’m baking them just for my immediate family, we eat a few then put them right into the freezer. This prevents us from eating the whole batch in one day! It’s hard to pass a plate of these and not grab one every time!!! While in the freezer, they’re available to be quickly defrosted whenever anyone wants a snack. They even taste amazing straight from the freezer! (Just ask my husband who never defrosts one before eating it!!!)

Chocolate Cherry Chunk Cookies   

(Full printable recipe below)

Makes one dozen cookies.

Ingredients:

-3/4 cup Otto’s Cassava Flour

-1 egg – room temperature (I use a duck egg since I’m sensitive to the protein in chicken eggs, but any egg works.)

-1/3 cup organic coconut oil – melted / or Spectrum organic vegetable shortening (not melted)

-1 teaspoon pure vanilla extract

-1/2 cup organic maple syrup -room temperature

-1 teaspoon cinnamon

-3/4 tsp baking soda

-1/4 teaspoon pink Himalayan salt

-3/4 cup dried cherries – (I use Trader Joe’s Dried Bing Cherries – unsulfured, no sugar added.) They are large, so feel free to cut them in half, if desired.)

-1 cup dairy-free chocolate chips (I use Enjoy Life  Dark Chocolate Morsels, semi-sweet baking chips, or mega chunks)

Directions:

Preheat oven to 375 degrees. In a large mixing bowl, blend maple syrup, melted coconut oil (or room temperature vegetable shortening), egg and vanilla. In a second bowl, mix Otto’s Cassava Flour, baking soda, cinnamon, and salt. Combine wet and dry ingredients into one bowl. Once fully blended, add dairy-free chocolate chips and dried cherries.

A mixing bowl with cassava flour cookie dough batter with added chocolate chips and dried cherries, unmixed.

Stir to combine.

A mixing bowl full of Chocolate Cherry Chunk Cassava Cookie dough.

On a parchment lined baking sheet, divide dough and press down to form 12-14 cookies.

Raw Chocolate Cherry Chunk Cassava Flour Cookies on parchment lined baked sheet.

Bake on middle rack of oven for about 12 minutes, or until edges begin to slightly brown.

Baked Chocolate Cherry Chunk Cassava Flour Cookies on parchment lined baking sheet.

Enjoy your Chocolate Cherry Chunk Cassava Flour Cookies!!!

*****

*****

*****

Chocolate Cherry Chunk Cassava Flour Cookies
Prep Time
5 mins
Cook Time
12 mins
Total Time
17 mins
 

This is no ordinary chocolate chip cookie! Yes, it has chocolate chips, but it also has dried cherries and cinnamon. YUM!!! And since these cookies are made with cassava flour, they're naturally gluten-free and full of whole-food goodness! They're soft-baked with a melt-in-your-mouth crumbly texture, and just enough maple syrup sweetness. These are my go-to cookie when I need to bake a quick, easy dessert for guests. They never disappoint!

Course: Dessert
Servings: 12 cookies
Author: Lauren from Crazy For Yuca
Ingredients
Ingredients
  • 3/4 cup Otto’s Cassava Flour
  • 1 cage-free egg (room temperature) I use a duck egg since I'm sensitive to the protein in chicken eggs, but any egg works.
  • 1/3 cup organic coconut oil – melted / or Spectrum organic palm shortening (room temperature)
  • 1 tsp vanilla
  • 1/2 cup organic maple syrup -room temperature.
  • -1 tsp cinnamon
  • -3/4 tsp baking soda
  • -1/4 teaspoon Himalayan sea salt
  • -3/4 cup dried cherries - cut in half (I use Trader Joe's Dried Bing Cherries - unsulfured, no sugar added.)
  • -1 cup dairy-free chocolate chips (I use Enjoy Life brand dark chocolate morsels, semi-sweet baking chips, or mega chunks.)
Instructions
Directions:
  1. Preheat oven to 375 degrees. 

  2. In a large mixing bowl, blend maple syrup, melted coconut oil (or room temperature vegetable shortening), egg and vanilla.

  3. In a second bowl, combine cassava flour, baking soda, cinnamon, and salt.

  4. Combine wet and dry ingredients into one bowl. 

  5. Once fully blended, add dairy-free chocolate chips and dried cherries. Stir to combine.

  6. On a parchment lined baking sheet, spoon and press dough into 12-14 equal sized cookies. 

  7. Bake on middle rack of oven for about 12 minutes, or until edges begin to slightly brown.

  8. Enjoy!

*****

Subscribe to Crazy For Yuca for free recipes and tips for living happy, healthy and gluten-free delivered right to your inbox. Never miss a recipe!

Disclaimer– In Crazy for Yuca I write about my own personal health and diet journey.  My experience and recipes are not to be considered expert advice or suggestive that anyone follow any particular diet protocol.  Each person’s body and medical issues are individual and need to be evaluated by a medical professional.  If you have any concerns due to your specific diagnoses, please consult your doctor before eating yuca.

Gluten-Free Cassava Flour Cake Pops

Gluten-Free Cassava Flour Cake Pops

Valentine’s Day Cassava Flour Cake Pops The time has come for the gluten-free and gluten-eating alike to enjoy cake pops together for all occasions!!! These pops are so incredible, no one will ever guess they’re gluten-free! Not to mention grain-free, dairy-free, soy-free, and nonGMO!!! I 

Cassava Flour Holiday Sugar Cookies

Cassava Flour Holiday Sugar Cookies

Being gluten-free doesn’t mean missing out on the fun of holiday cookie baking! With cassava flour, you can make scrumptious gluten-free, whole-food sugar cookies that taste just like those made from wheat flour! If you haven’t discovered cassava flour yet, these Cassava Flour Holiday Sugar 

Icing Colored with Fruits and Vegetables

Icing Colored with Fruits and Vegetables

Cassava Flour Christmas Tree Sugar Cookie with icing colored with spinach.

Can you believe that the icing for this Christmas tree cookie was colored with spinach? It’s true!!! And the tree trunk was colored with cinnamon! This year I thought I’d have a little fun experimenting with fruits, vegetables, and spices as natural dyes for the icing of my Holiday Cassava Flour Sugar Cookies. I had a number of successes, and a few disappointments, which I’ll share in case you’d like to give it a try. (My Holiday Cassava Flour Sugar Cookies will be posted in a separate post within the next few days.)

Holiday cookie baking is a tradition in many homes. Just because you’re gluten-free and/or dedicated to clean eating doesn’t mean you have to miss out! With a few swaps and tips, you can enjoy holiday baking and maintain dedication to your dietary goals and health.

There has been concern for decades about the potential negative effects of consuming artificial colorings. While research is still debating this issue, it seems like a good idea to avoid synthetic dyes whenever possible. (See Healthy Eating Tip below for more information regarding synthetic coloring used today and health concerns.)


White Icing Base

Blend:

  • 1 cup powdered confectioners sugar
  • 1 teaspoon vanilla extract
  • 1 1/2 tablespoons water.

Bowl of white icing for decorating sugar cookies.


Adding fruits, vegetables, and spices

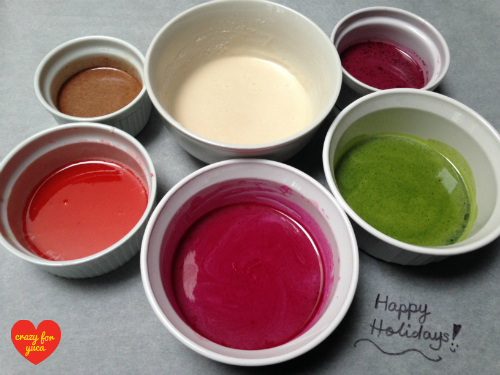
I added juiced fruits and vegetables such as spinach, beets, strawberries, and blueberries, as well as cinnamon and turmeric to the white icing base to see what kinds of colors I could create!


Spinach was my first experiment since I needed green for my Christmas tree holiday cookies.

I took a handful of fresh baby spinach and put it through my juicer. I then added 4 tsp of spinach juice to my white icing, 1 tsp at a time, until I reached a nice, deep, tree-colored green.

Bowl of icing being made with juiced spinach as food coloring.


A bowl of green icing colored with spinach juice.


This green icing went on really smoothly. I was super happy with the color and how it adhered to the cookies. They tasted great – not like spinach at all! The only small issue was that the next day a few of them had some patches of lighter colored green (as seen in the picture below.) If they’re iced the same day as they’re eaten they look perfect! I’d prefer avoiding chemical food dyes in favor of having delicious cookies with some slight color variation, but decide for yourself based on your needs.


Two Holiday Cassava Flour Sugar Cookies in the shape of Christmas trees with icing that was colored with fresh spinach juice.


I sprinkled a pinch of TruColor Natural Sanding Sugar on top of the cookies to make them look like decorated Christmas trees. This topping contains only sugar, vegetable color, and carnauba wax. It’s not as fancy as putting lots of brightly colored candy balls on it, but it’s a whole lot “cleaner.”


The next vegetable I used was beets in attempt to make a nice holiday red!  I figured beets would be perfect since every time I cook with them my fingers turn bright red!

Avoiding the red dyes in food coloring (specifically Red 40 and Red 3) seems particularly worthwhile since they’ve been among the most questionable dyes in terms of possible negative health effects in recent years (along with yellow 5.) The FDA doesn’t maintain that currently approved red food colorings are definitively safe, only that there’s a standard of “reasonable safety of no harm”(1.) I’d rather be safe than sorry!

To make my beet colored icing, I placed 1/3 of a peeled fresh beet into my juicer and then mixed beet juice into the white icing. Two teaspoons of beet juice created a rich pink color. (See first picture below.) Adding 2 additional teaspoons of beet juice created a deeper reddish-pink icing. (See second picture below.) The amount of beet juice used can be adjusted until desired color is reached.  This is a great coloring option for those who enjoy the sweet taste of beets, as the beets not only colored, but also flavored the icing.

Icing with 1 tsp beet juice
Bowl of icing colored with fresh beet juice.


Icing with 2 tsp beet juice

Bowl of red icing colored with fresh beet juice.


Since I’m not a huge beet lover, I decided to try making red icing with organic frozen strawberries. I placed a few berries into a saucepan and heated them until they defrosted and became soft and broken down. When heated, a nice amount of juice gets extracted from frozen berries. I then spooned out a few teaspoons of strawberry juice and mixed it into the white icing. (Pictured on the left below.) To get the most juice out of the strawberries, without adding strawberry fragments to the icing, straining it through a cheesecloth would likely have worked really well. (I’ll definitely try that next time. If you try it – leave a comment below and let me know how it goes!) The color of this icing was a true red, but a bit translucent compared to the beet colored icing. It tasted delicious, with the fresh strawberry flavor completely infusing the icing!

Strawberry Icing                                          Beet IcingOne bowl icing colored with fresh strawberry juice and a second colored with beets.


I used the strawberry colored icing to color the hats of my snowman cookies! (Sorry – not the best quality picture.) Here’s another word of warning – when making naturally decorated snowman cookies – DON’T USE REAL CARROTS FOR THE NOSE! As you can see in this picture, the moisture from the carrot diffused into the icing and damaged it. A better option would have been dried fruit like mangos or apricots. Live and learn!

Snowman Cassava Flour Sugar Cookie.


Next I used the same process that I used for the strawberries with blueberries. I was hoping to make blue icing to use for Chanuka sugar cookies. In hindsight, I guess I should have anticipated the color would be more purple than blue. (See picture below.) This purple blueberry icing was still yummy! For a truly smooth icing, strain extracted blueberry juice through a cheesecloth before adding it to the white icing to avoid the blueberry fragments seen in the picture below.

Purple icing made with organic frozen blueberries.


Probably the best combination in terms of taste and color came with the addition of 2 teaspoons of cinnamon to the white icing! I made these adorable reindeer using it. The light brown is the cinnamon icing and the dark brown antlers and eyes were made with Enjoy Life Semi-Sweet Mini Chips. They are gluten, dairy, nut and soy free!

Plated Rudolph the Red Nosed Reindeer Cassava Flour Sugar Cookies.


In order to make a yellow icing, I used powdered turmeric. Like beets, I assumed it would be a good coloring since it dyes my hands and kitchen towels yellow if I’m not careful when cooking with it. I added 3/4 teaspoon turmeric to the white icing base recipe to make the yellow in the picture below. The turmeric didn’t overpower the sweet taste of the icing so they tasted great!. Turmeric made a perfect yellow-gold color for the flames on the candles of my Chanukah menorah cookies!

Yellow sugar cookie icing colored with turmeric.


Since my blueberry icing wasn’t a true blue, and blue is absolutely necessary for Chanukah sugar cookies, I did some research and found ColorKitchen Real Food Decorative Coloring in blue. The only ingredient is “spirulina color” which is a natural colorant. It came as a powder packet, which I added to my white icing base to make the color seen in the picture below. (Note: The powder didn’t fully dissolve in the icing and some speckles are apparant.)

Chanukah Cassava Flour Holiday Cookies made with natural icing dyes.


*Tip – This type of icing dries out after a few hours. If decorating cookies over many hours place a wet cloth or paper towel over each bowl of icing to keep it moist. Even dried out icing can be brought back to life with a drip of water and a little mixing. (Use a very small amount of water and add additional if needed so the icing doesn’t become watered down.)

*****

*****


Healthy Eating Tip: Consider removing foods from your diet that contain artificial food dyes.

Did you know that there are only 9 artificial colorings still certified by the FDA for use in food? It seems that every few years another one is linked to cancer or other health problems, and then banned! The most controversial dyes today are Red No. 40 and Yellow No. 5. Research suggests that Yellow No. 5 may cause migraines, anxiety, and even cancer (1.) Red 40 has been shown to cause allergic reactions and hyperactivity in some children (2.) In mice, research demonstrated that Red 40 decreases survival, reproductive success, brain weight, as well as parental and offspring weight. Evidence of both physical and behavioral toxicity were evident (3.)

FDA certified colorings are required to be listed on product labels. The FDA standard states that there’s a “reasonable safety of no harm” when used properly (1960 Color Additive Amendments.) That’s not the same thing as declaring they’re perfectly safe (4). Different colorings are only approved for use in specific foods, and in certain amounts (although most package labels don’t disclose how much is actually in the food!) The list of certified dyes below is taken from the FDA website (5) and states the foods for which each dye is approved.

  • FD&C Blue No. 1 – Confections, beverages, cereals, frozen dairy desserts, popsicles, frostings & icings
  • FD&C Blue No. 2 – Baked goods, cereals, snack foods, ice cream, confections, and yogurt
  • FD&C Green No. 3 – Cereal, ice cream, sherbet, drink mixers, and baked goods
  • Orange B – Only approved for use in hot dog and sausage casings
  • Citrus Red No. 2 – Only approved for use to color orange peels
  • FD&C Red No. 3 – Confections, beverages, cereals, ice cream cones, frozen dairy desserts, popsicles, frostings & icings
  • FD&C Red No. 40 – Cereal, beverages, gelatins, puddings, dairy products, and confections
  • FD&C Yellow No. 5 – Confections, cereals, snack foods, beverages, condiments, baked goods, and yogurt
  • FD&C Yellow No. 6 – Cereals, snack foods, baked goods, gelatins, beverages, dessert powders, crackers, and sauces

In pre-industrial times, colorings were made naturally from flowers, roots, fruits, and vegetables. After the Industrial Revolution, companies started using additional colorings to increase the attractiveness of their products and many people had toxic reactions. The government then funded research to specifically investigate the safety of colorants used, which led to the The Pure Food and Drug Act of 1906. They actually used dangerous metals such as mercury, copper and arsenic (6) as food coloring in those days! In 1907, the Agriculture Department issued the Food Inspection Decision (F.I.D.) 76 which decreased the number of allowed synthetic colors from several hundred to only seven (7!) Four of the 7 are still being used today (4.) Later, derivatives of coal tar were used to create dyes. Today, many color additives are still synthesized from coal and petroleum sources (8) allowing scientists to create vibrant, attractive colors in the lab with chemicals.

Food manufacturers use these chemical colorings like artists use paint, to artificially make our food look more appealing. It’s time to become aware of what is put into processed food and either eliminate it completely, or avoid those products with potentially harmful dyes and additives. It’s safer, and a lot more fun to be your own artist and color your icing naturally.


*****


Subscribe to Crazy For Yuca to have my newest recipes sent right to your inbox! Enter your email in the top right corner of this post and live happy, healthy and gluten-free!


*****


*****


Disclaimer– In Crazy for Yuca I write about my own personal health and diet journey.  My experience and recipes are not to be considered expert advice or suggestive that anyone follow any particular diet protocol.  Each person’s body and medical issues are individual and need to be evaluated by a medical professional.  If you have any concerns due to your specific diagnoses, please consult your doctor before eating yuca.


Strawberry Almond Butter Pinwheel Cookies (Grain-Free, Gluten-Free, Dairy-Free)

Strawberry Almond Butter Pinwheel Cookies (Grain-Free, Gluten-Free, Dairy-Free)

Have you tried baking with cassava flour yet? If not, this is the perfect cookie recipe to get you started! Whether you’re gluten-free, or just want to eat less grain, these cassava flour Strawberry Almond Butter Pinwheel Cookies are fun to make and to eat! 

Otto’s Cassava Flour

Otto’s Cassava Flour

Otto’s Cassava Flour If you haven’t tried Otto’s Cassava Flour yet, what are you waiting for??   Otto’s Naturals 100% Natural Cassava Flour Made from Yuca Root Bag, 2 PoundCassava flour is a relatively new flour that is starting to become popular in the healthy